
Every business receives various web form requests daily, from lead generation forms to support requests to name a few. But before you can take the appropriate actions in response to these forms, chances are you need to export web forms data to Excel. And so you find yourself spending a lot of time entering that data manually, which hinders your capacity to respond quickly.
If you are looking for a solution that handles data entry in your stead so you can focus on more impactful work, like converting leads or providing customer service, you’re in luck: Mailparser does just that. This post will show you how to extract data from web forms to Excel quickly and easily.
Manual Data Entry Blocks You from Taking Prompt Action
Your business regularly receives a variety of web forms that need processing. Examples of forms include:
- Contact forms
- Lead capture forms
- Sign-up forms
- Order checkouts
- Support requests
- Appointment bookings
- Customer feedback
- Surveys
The data within these forms needs to go into your system before you can act on it. That could be your CRM, ERP, or simply Google Sheets. Once the web form data is in that system, you can move on to the required actions such as:
- Answer questions
- Contact leads
- Schedule phone and video calls
- Solve customer issues
- Analyze customer feedback
Fast response times are particularly important in lead conversion. The sooner you can connect with a lead, the higher your chances of moving them down the sales path and turning them into a customer. In fact, 49.7% of marketers say that forms are the highest-converting method of lead generation.
But If you enter data manually, you know how exhausting and time-consuming it can get. Leads that expressed interest in your business will turn to competitors if you fail to get back to them within a short period of time.

Likewise, a customer who contacts your business to get help with an issue, only to get a late response, will be disappointed with your customer service. They may leave a negative review or stop purchasing your products or services.
On top of that, manual data entry is inherently error-prone. And data errors can lead to mistakes, a drop in productivity, strained relationships, and lost opportunities.
The Solution: Replace Manual Data Entry with Data Extraction
On the bright side, technology has evolved enough to help you automate web form processing as well as other similar tasks.
In today’s world, manual data entry is no longer a necessity. You can use an automation tool that extracts data for you with higher accuracy than any person can do. If you know the pain of copying data from countless emails, then the idea of an automation tool that takes this task off your plate definitely sounds great.

You most likely receive web forms data via email, so the best automation tool to extract data into Excel is an email parser.
Mailparser is the best email parser to extract web forms to Excel. It automates data entry so you can focus on your important work.
In fact, as of the time of publishing this article, over 134 million emails have been processed with Mailparser.
Beyond just Excel, you can send your extracted data to other platforms as well:
- Google Sheets
- Salesforce
- Slack
- And a lot more
Intrigued? Let’s see how Mailparser works.
How to Export Your Business’ Web Forms to Excel with Mailparser
Mailparser is a simple tool that you can set up in minutes without having to write a line of code. To illustrate how it works, we are going to use a lead inquiry scenario as an example. Suppose your company provides cloud solutions for businesses and you have received a lead inquiry through the contact form on your website.
Below are the steps you need to follow to extract your web form data:
Step 1: Sign up for a free Mailparser account
Create your free Mailparser account here. You can use your trial account to parse up to 30 emails every month without a time limit.
Step 2: Create your Mailparser inbox
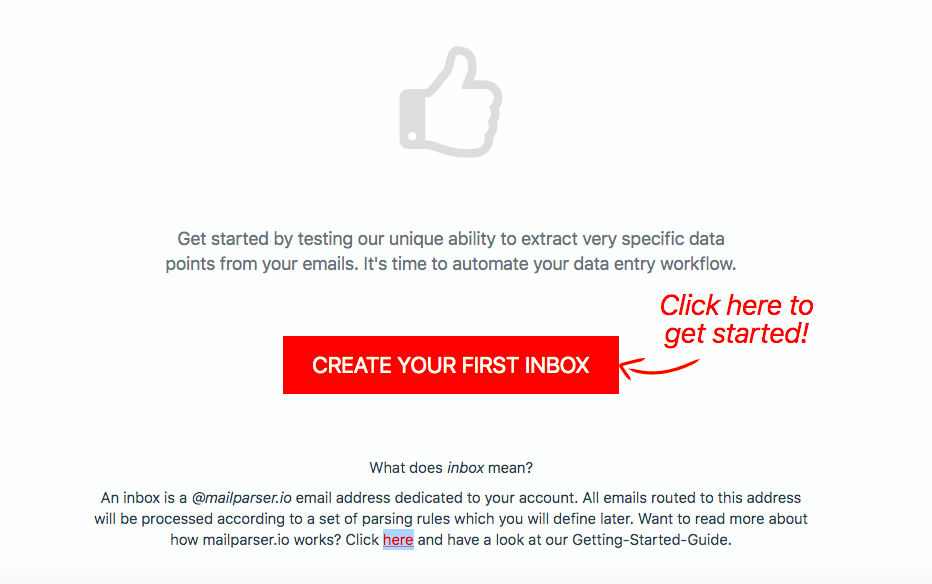
Right after signing up and landing on your trial account, you will notice a red button asking you to create your first inbox. This is where Mailparser receives and parses your emails. You can create several inboxes for different kinds of web forms (up to 10 inboxes with your free account).
To create your inbox, click on the button and type the inbox’s name. Mailparser will then generate a unique inbox address.
Note that you can set up your email service provider to automatically forward emails to your Mailparser inbox. If you use Gmail, read this article to learn how to forward multiple emails in Gmail.
Step 3: Forward a sample email to your inbox
Pick at least one email from your inbox and forward it to your Mailparser inbox address. You can forward several emails at once to see if the parsing results are consistent across all of them.
Return to your Mailparser account and you’ll see a message prompting you to add Parsing Rules, which are the instructions you give to Mailparser to make it identify and extract the data you want. Each Parsing Rule extracts one data field from the email, so you will need several Rules to extract all the data you need.
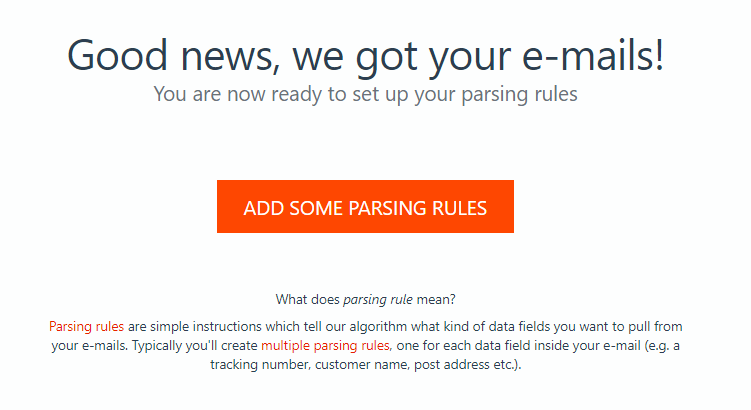
Step 4: Set up Parsing Rules
Click on the orange button shown above and Mailparser will try to create parsing rules on its own. You can see the result of this first attempt below:
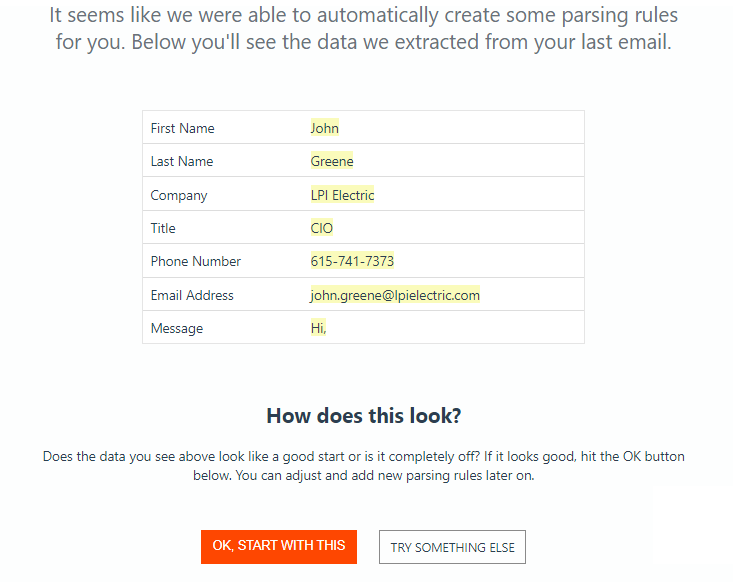
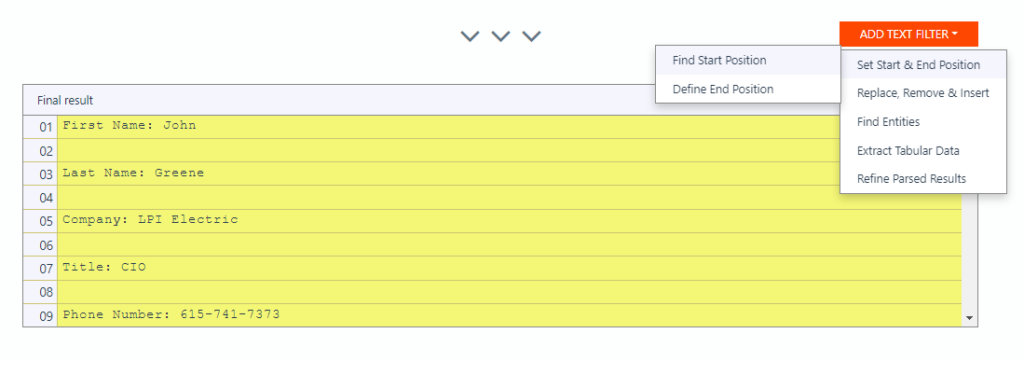
As you can see, Mailparser has already extracted much of the web form data like the lead’s name, their title, the name of the company they work at, and so on. However, the message written by the lead was not extracted. So we’re going to edit the ‘Message’ Rule to refine the parsing results. For now, click on the ‘OK, start with this’ button.
Step 5: Edit Parsing Rules
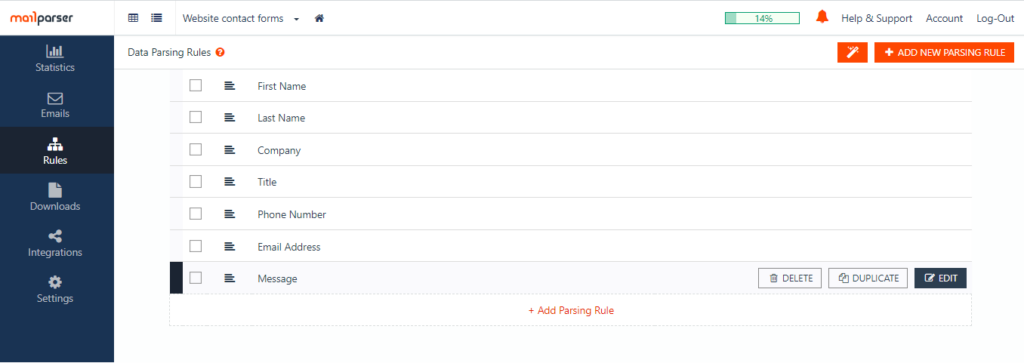
Mailparser will direct you to your account dashboard. Go to ‘Rules’ on the left-hand side panel and you will see the Parsing Rules created by Mailparser. Move your cursor over to the ‘Message’ Rule and click on the Edit button on the right.
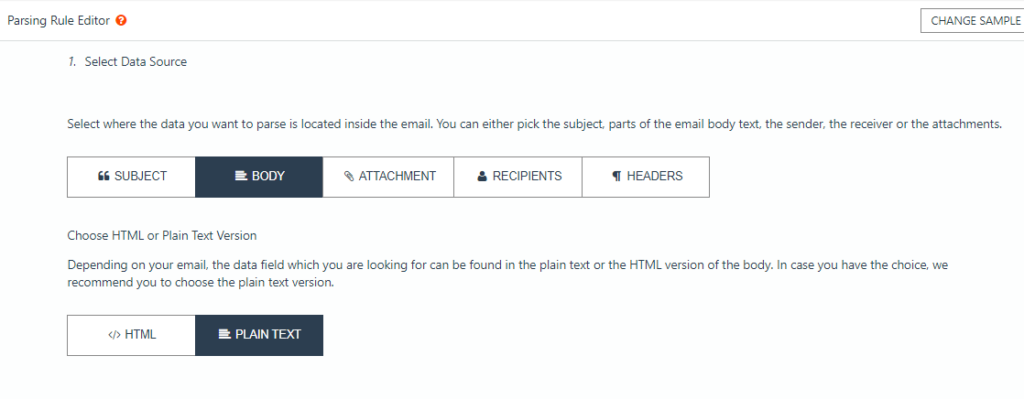
Once you’re in the Parsing Rule Editor, select ‘Plain Text’ under the data source section.
After that, you need to create filters that help Mailparser isolate the data you need. Scroll down the ‘Add Text Filter’ button on the right. Go to ‘Set Start & End Position’ and choose ‘Find Start Position’.
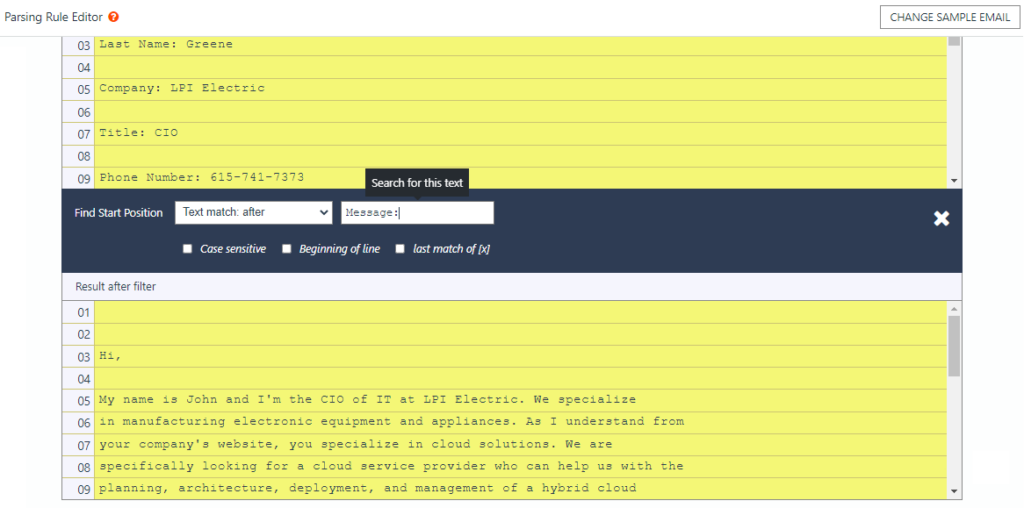
The Editor will show you a dropdown list with several parsing options. Pick the option ‘Text match: after’ and type “Message:“. Mailparser will filter all the data that comes before that specific text.
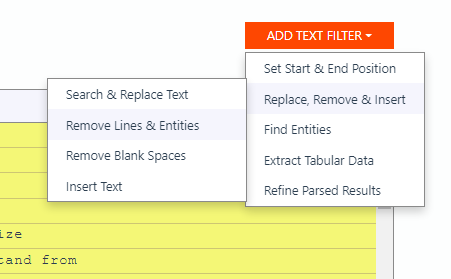
We’re getting close! What you want to do now is to remove the empty lines above the message text. To do that, scroll down to add a second text filter. This time, go to ‘Replace, Remove & Insert’ then select ‘Remove Lines & Entities’.
Select ‘Remove Empty Lines’ from the dropdown list. Mailparser will show you what the result looks like.

Mailparser has successfully extracted the whole message. Almost there!
Alternatively, you can choose the option ‘Remove Line Breaks’ to make the whole message fit into one single paragraph. Feel free to try different options and see what works best for you!
Click on the ‘OK, Looks Good!’ button at the bottom right of the Parsing Rule Editor. You can change the name of the Rule if you like; in this case, it’s not necessary. Lastly, click on ‘Validate & Save’ and the Message Rule is good to go.
Step 6: Check the parsing results
Go back to the Emails section of your account and click on your email. You can see now the parsed data highlighted in yellow.
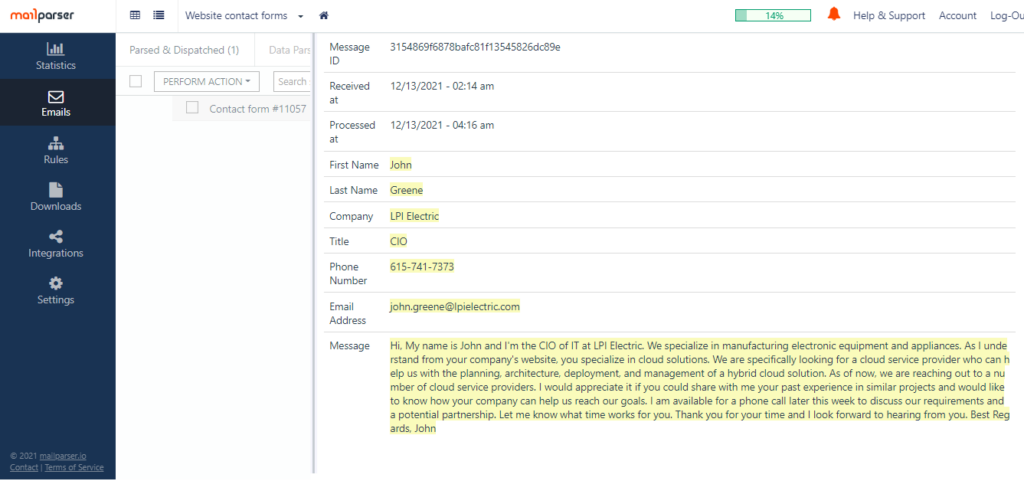
Success! The web form data has been extracted with 100% accuracy. Now Mailparser can pare any number of web forms that you receive by email, effectively saving you a great deal of time and effort.
Now onto the final step: Export your data to Excel.
Step 7: Export your parsed data to Excel
You’re almost there! Go to ‘Downloads’ on the left-hand side panel and click on the button ‘Create First Download Link’.
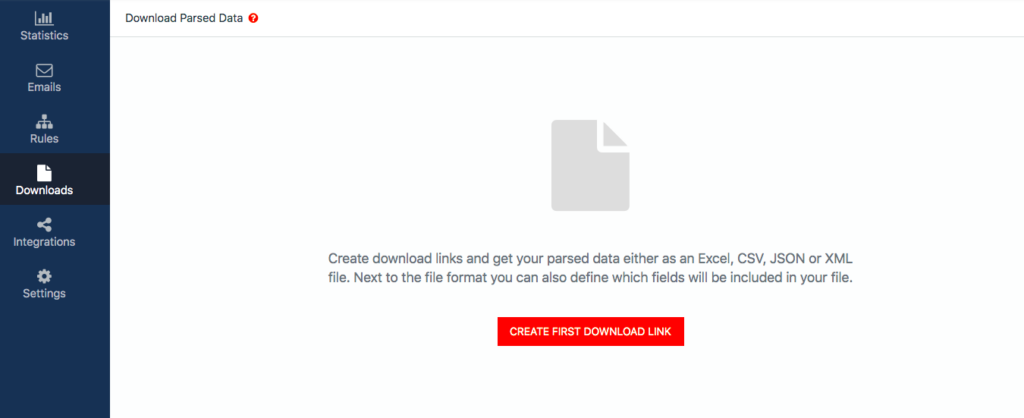
You will find four download options for four file formats: XLS, CSV, JSON, and XML. Pick the ‘MS Excel Spreadsheet’ option. Type a name for your Excel file and click on ‘Save’.

Click on the link and choose the location where you want to save your Excel file. Open it and check the parsing results.
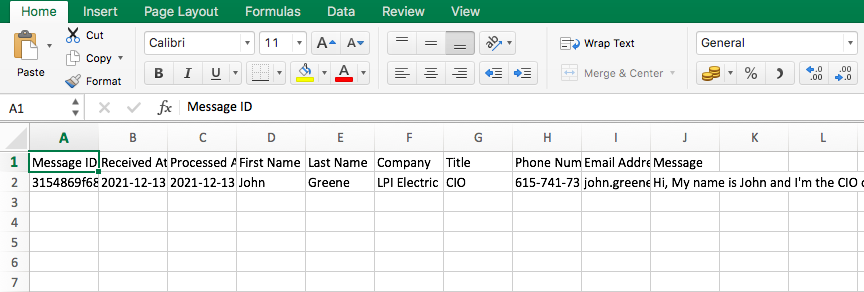
And that’s how you export your business’ web forms to Excel! Simple, right? As you can see, the whole process takes only a few minutes and there is no technical knowledge required. We built Mailparser to be easy to use by anyone in any industry, whether they are a technical or non-technical user.
Exporting Web Forms to Excel – FAQ
Can I extract data from email attachments?
Yes, you can do that with Mailparser. You can extract data from an email’s subject line and body as well as attachments like Word or Excel documents.
Can I export web form data to Google Sheets?
Yes. The steps to export data to Google Sheets are the same except for the last one. Instead of downloading your data as an Excel file, you need to set up an integration with Google Sheets. This article shows you how to do this.
Can I integrate Mailparser with my cloud app?
Absolutely. Mailparser can integrate with 1,500+ cloud applications. You can easily set up an integration with any of the most used platforms like Salesforce. In case you need help with setting up an integration, our support team is always available to assist you.
What if I want to extract data from documents instead of emails?
In that case, you can try our companion app, Docparser. This document parser works similarly to Maiparser and can extract data from documents of various formats to Salesforce.
A Couple of Mailparser Users Who Use It To Extract Web Form Data
BMC Switzerland, a Swiss bicycle and cycling product manufacturer, used to rely on external developers for automated data processing of web forms. The company found Mailparser to be a much faster and more cost-effective alternative.
“With our current backend system, we regularly had to hand over a programming task to our external developers whenever we had a new web form that needed some automated data processing. Needless to say that this is not optimal from a time and cost perspective.
After evaluating various online services we ended up with the combination of mailparser.io and zapier.com which both can be set up by us within a few hours. Mailparser.io is the perfect online tool to parse and enrich the incoming web form data and zapier.com is the tool responsible for distributing the data to various other online tools. Mailparser.io proves to be innovative by regularly implementing new features and their support team is very responsive and helpful. Thumbs up…”
Andres Hess – BMC Switzerland
Similarly, the Giltedge Group, a global travel company based in South Africa, uses Mailparser to extract data from web forms and send it to Zoho.
“We are currently using Mailparser.io in 3 different ways. [The first is] Loading web inquiries to our CRM (Zoho): our web forms can’t connect directly to the CRM so we generate an email every time the inquiry form is completed, Mailparser.io picks the information & sends it to our CRM for handling.”
Julien – The Giltedge Group
The Giltedge Group also uses Mailparser to back up new bookings registered via Zoho onto Google Sheets and Process insurance purchase notifications from their partner. So as you can see, while Mailparser is great for extracting email data to Excel, you will also find other uses that save time and boost productivity even further.
In Conclusion
Being able to respond quickly to inquiries is critical for lead conversion, customer service, and other core tasks in your business. But if manual data entry has been bogging down your productivity, it’s high time you let automation handle it while you and your team focus on tasks that are more valuable.
You can start implementing automation today by exporting web forms to Excel with Mailparser. Sign up for your free account and try the features of Mailparser to see how much time, effort, and money you can save with email parsing.