Excel is a wonderful tool, but sometimes you need business data to be accessible in other applications like a CRM or Google Sheets.
When a large amount of data is trapped in Excel documents, parsing it manually becomes a serious challenge. It’s a time-consuming task that can cost you opportunities, and its repetitive nature can lead to mistakes.
Luckily, it is possible to automate this process to save a massive amount of time and money. This article will teach you how to parse data from Excel using Mailparser and send it to any application you want. Let’s get started.
Try it free. No credit card required.
How to Parse Data from Excel
Parsing data means you break it down into separate components. For example, you split a column of full names into one column for first names and one for surnames.
There is more than one way to extract data from Excel and send it elsewhere. Let’s take a look at two different methods.
Method 1: How to Parse Data from Excel Manually
First, open your Excel spreadsheet and highlight the column that has the combined data you want to parse.
Next, go to the ‘Data’ tab and click on the ‘Text to Columns’ icon. A pop-up window titled ‘Convert Text to Columns Wizard’ will appear. You have now three quick steps to follow to parse data in Excel:
Step 1: Select ‘Delimited’ and click on ‘Next’.
Step 2: Select the delimiter that separates the data you want to parse. This can be a comma, a semicolon, a blank space, a tab, or some other character which you can type in the field next to ‘Other’. Once you have selected the delimiter, click on ‘Next’.
Step 3: Select ‘General’ under ‘Column data format’ and click on ‘Finish’.
The parsed data will now appear in several columns.
You can now copy and paste the columns containing the parsed data into the application that you use (Google Sheets, Salesforce, etc.).
However, this method is only viable if you have a single document to parse. If your team receives tens or even hundreds of spreadsheets regularly, parsing data manually is going to be too time-consuming to be worthwhile. In this case, you need a tool that automates the data entry process.
Method 2: How to Parse Data from Excel with Mailparser
If your business has large volumes of data trapped in Excel and you want to automate the data entry workflow, then Mailparser is a much more effective alternative. Here’s a high-level overview of how it works.
- Step 1: Create a Mailparser account (free for 30 days)
- Step 2: Create an inbox
- Step 3: Send an Excel spreadsheet to your inbox
- Step 4: Add parsing rules
- Step 5: Send your parsed data to your application of choice
Now, let’s take a deeper look at each step.
Step 1: Create a Mailparser account
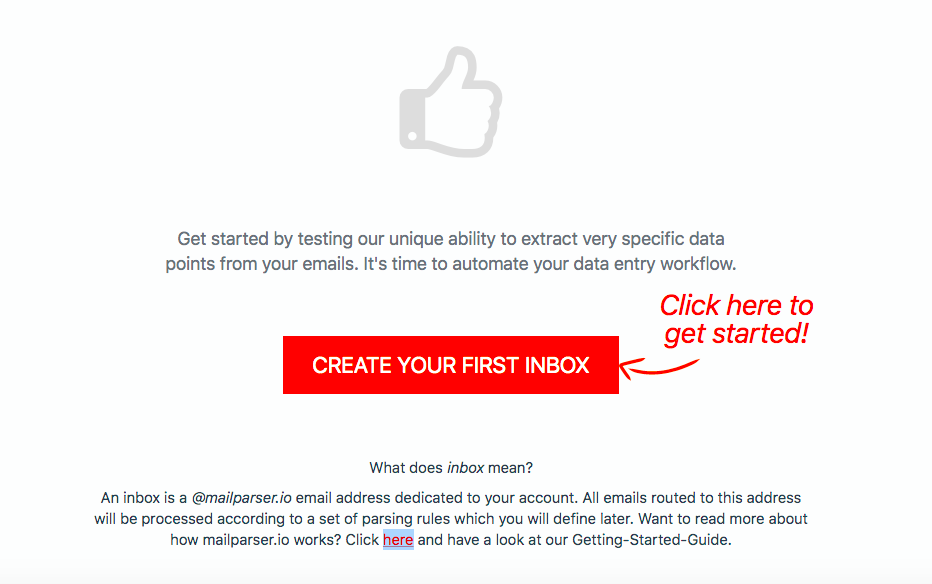
The first thing you need to do is to sign up for a Mailparser account. It’s free and you don’t have to enter credit card information.
30 Day Trial. No credit card required.
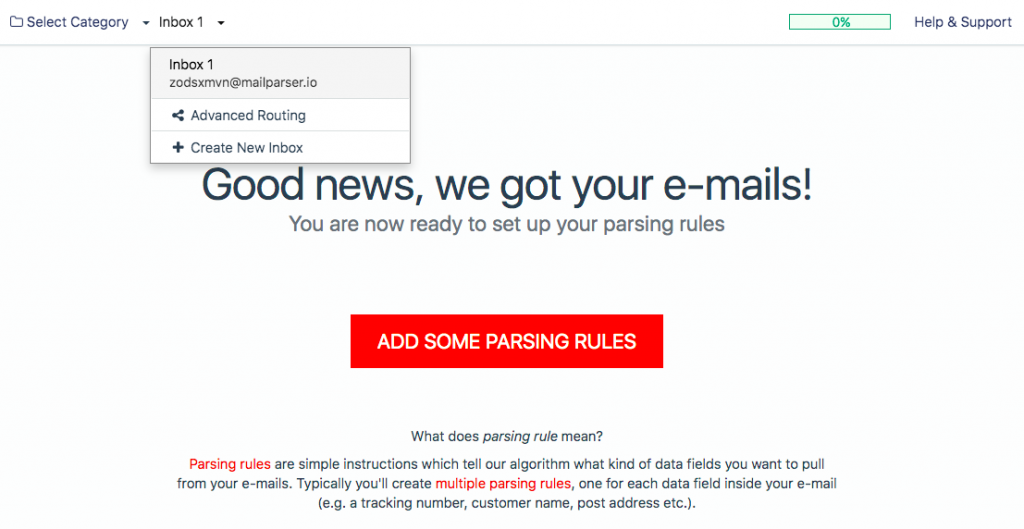
Step 2: Create an inbox
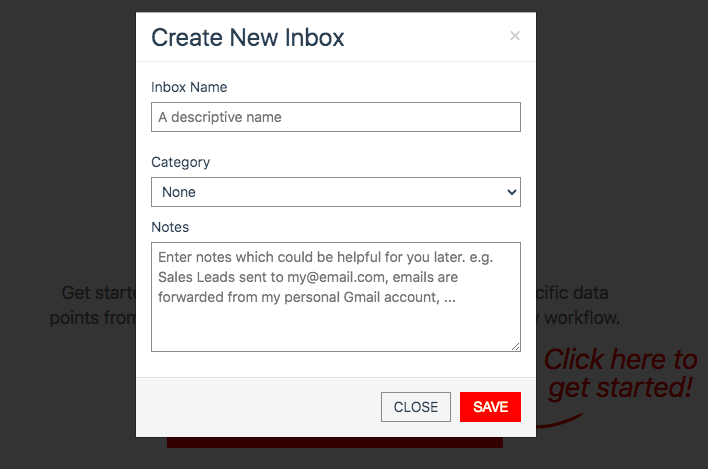
Once your account is created, you have to create an inbox where your Excel documents will go. Click on ‘Create Your First Inbox’.
A pop-up window will then appear. Type a name for your inbox in, add notes if you want, and click on ‘Save’. For this example, I simply named my inbox “Inbox 1”.
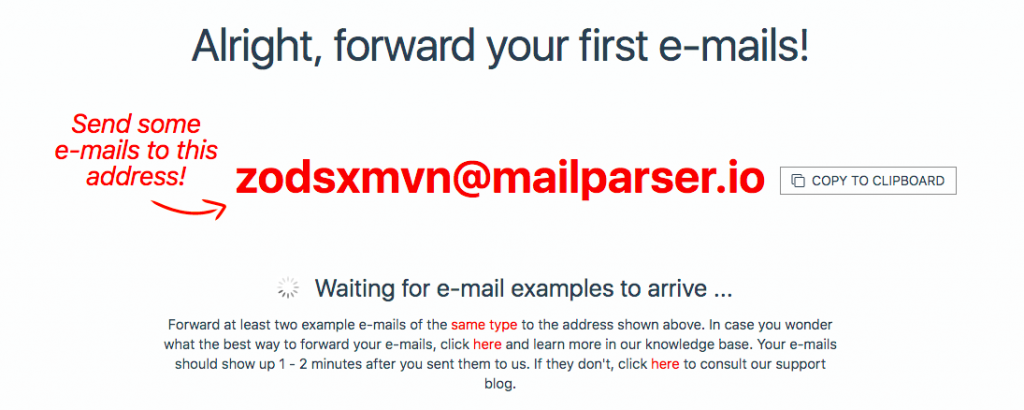
Mailparser will instantly generate a unique email address for your new inbox. This is because Mailparser uses emails as its data source. It can extract data from emails as well as the documents attached to them, such as PDF, Word, or – in our case – Excel.
Step 3: Send an Excel spreadsheet to your inbox
Send an email with your Excel spreadsheet attached – whether in XLS, XLSX, or CSV format – to your Mailparser email address.
Note: you can set up emails with Excel attachments to be automatically forwarded to your Mailparser inbox. That way, you won’t have to manually send them to Mailparser every time you receive them.
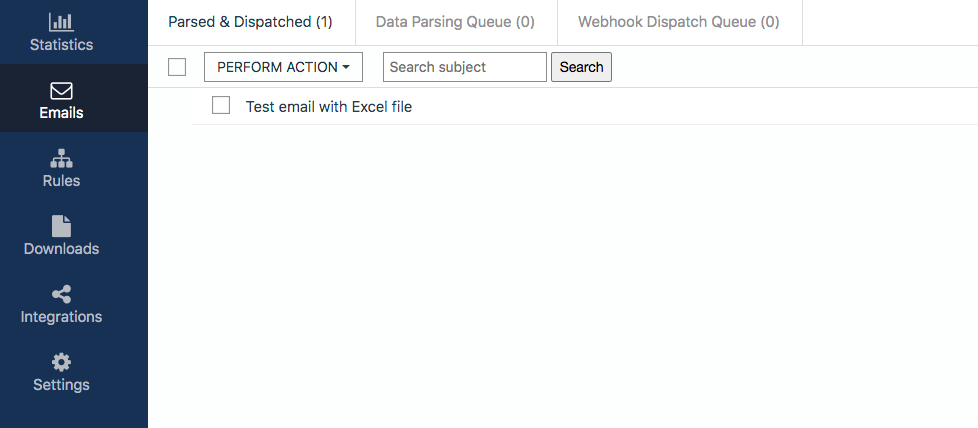
Go to your Mailparser account, click on ‘Inbox 1’ at the top left of your screen and select your inbox.
You will find your email with the Excel file attached to it; click on it. Time to parse the data!
Step 4: Add parsing rules
A parsing rule is a set of instructions you give to the Mailparser algorithm so that it can recognize, reorganize, and extract the data you want.
Each inbox has a specific set of parsing rules that tell Mailparser how to parse data from Excel. So when you want to parse data from documents that are used for different purposes, or documents in other formats like Word, create new inboxes with different parsing rules. Note that you can create up to 10 inboxes with your free plan.
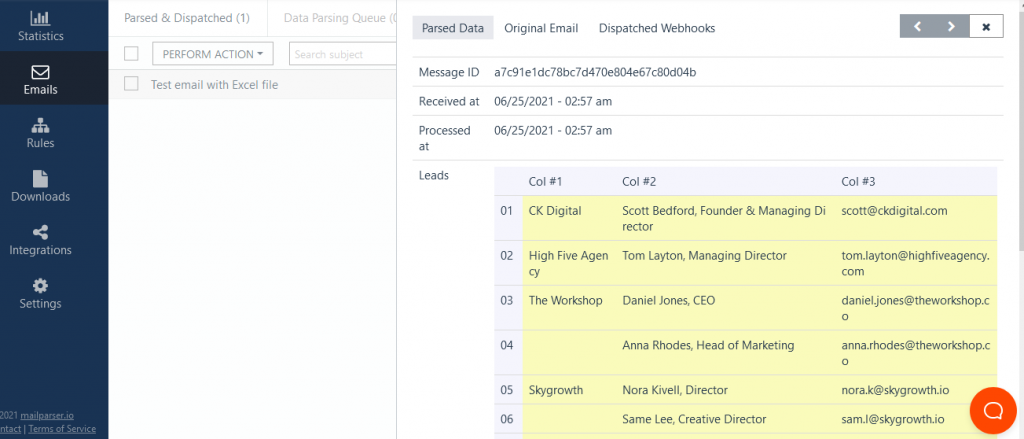
Now, click on the email you received and you will notice that Mailparser has already parsed the data since the layout of the Excel file I used is quite simple. At this point, you can already send the data to a third-party application. But before that, we want to go a step further – let’s add a few parsing rules.
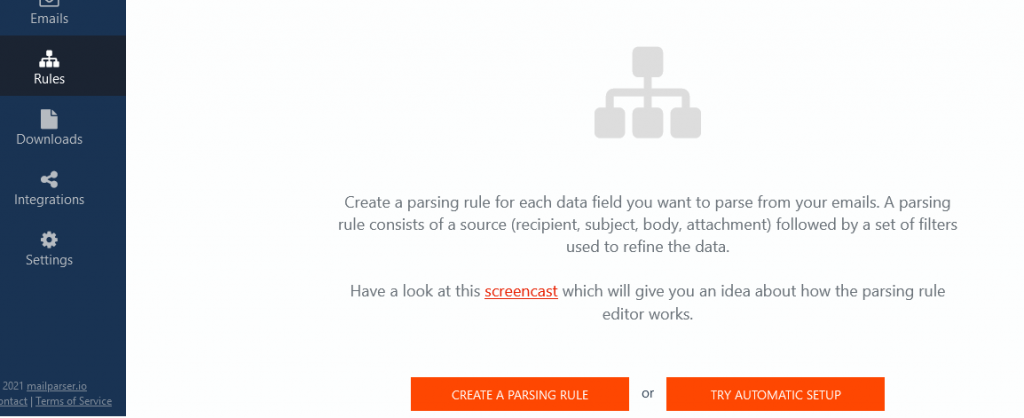
Click on ‘Rules’ on the left-hand side panel then click on the ‘Create a Parsing Rule’ orange button.
Click on ‘Attachment’ to set your Excel file as the data source to parse from.

Scroll down and choose ‘File content (Table Cells)’ from the drop-down menu next to ‘Parse attachments’. The rule editor will now display the columns and rows from your Excel spreadsheet.
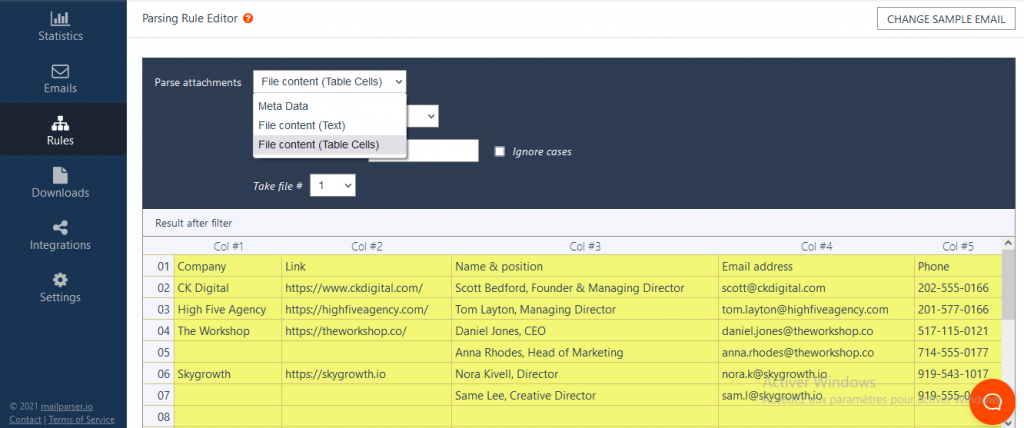
Now, here’s what I want to do with my data:
- Remove the first row, since the spreadsheet where I will send the data will already have a header row with the same information.
- Remove Column #2
- Split Column #3 into two columns, one for the person’s name and one for their position.
To do that, scroll down further and click on the button that says ‘Add Cell Filter’ on the right. A drop-down list will appear. Move the cursor to ‘Remove & Select’ and click on ‘Remove Rows’.
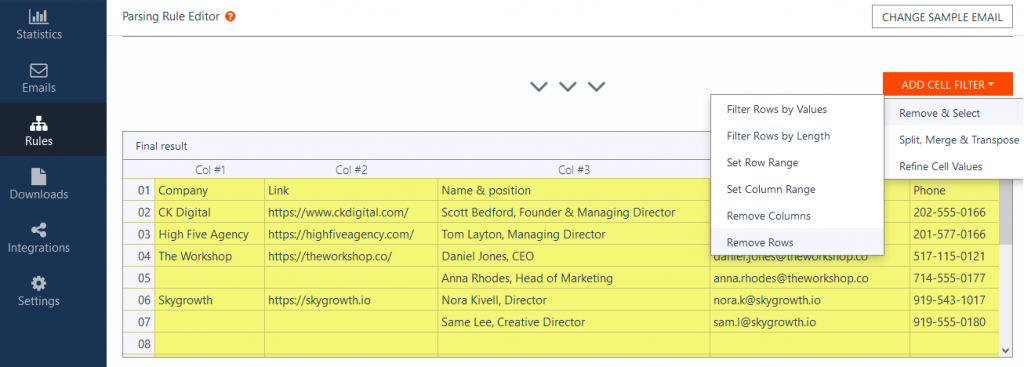
Mailparser selects the first row by default, but you can remove any row you want just by selecting its number. You can also remove several rows at the same time if you want.
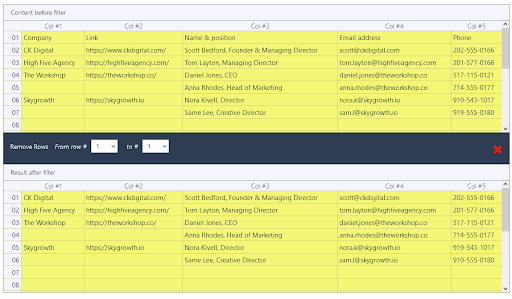
See how Mailparser shows you what your spreadsheet looks like both before and after adding the filter. The first parsing rule is now set, so let’s move to the next.
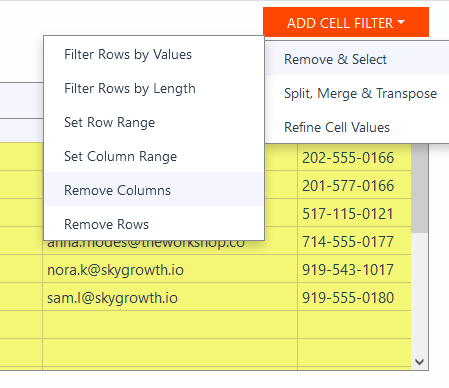
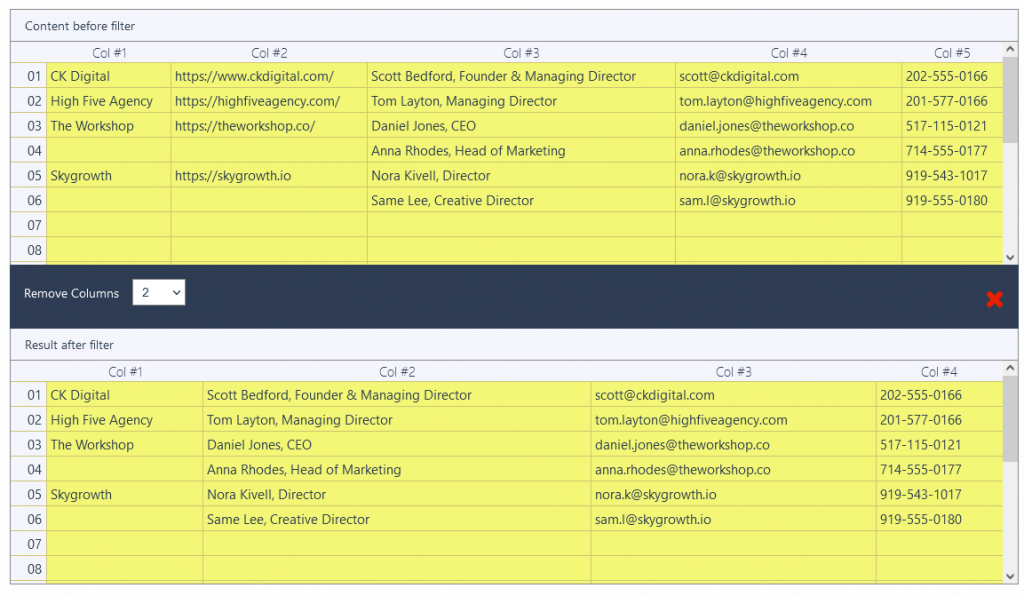
For every additional parsing rule you want to add, just scroll down below the last one and you will find a new ‘Add Cell Filter’ button. Go to ‘Remove & Select’ and click on ‘Remove Columns’.
Choose ‘2’ in the drop-down list next to ‘Remove Columns’ and the second column will be gone.
Moving on to step 3, we want to display the names and positions on separate columns. To do that, scroll down and click on the ‘Add Cell Filter’ button. Move your cursor to ‘Split, Merge & Transpose’ and click on ‘Explode Columns’.
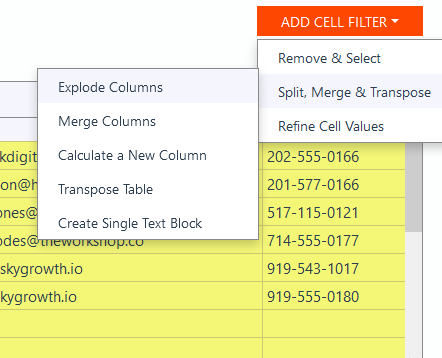
Go to the drop-down menu on the right, next to ‘Explode Columns’, and select ‘Split at a character’.
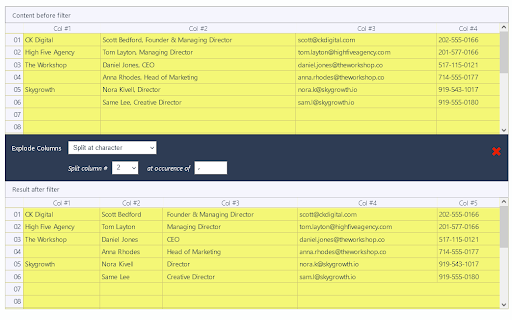
We are going to set a specific character to determine where to split the data within the column (like in method 1). This character is the comma which you can see written after the names on Column #2.
So choose ‘2’ from the drop-down list next to ‘Split column’ and type a comma in the field next to ‘at occurrence of’. The Rule Editor will apply this new filter and show you the result below. Now the names are in Column #2 and the positions in Column #3.
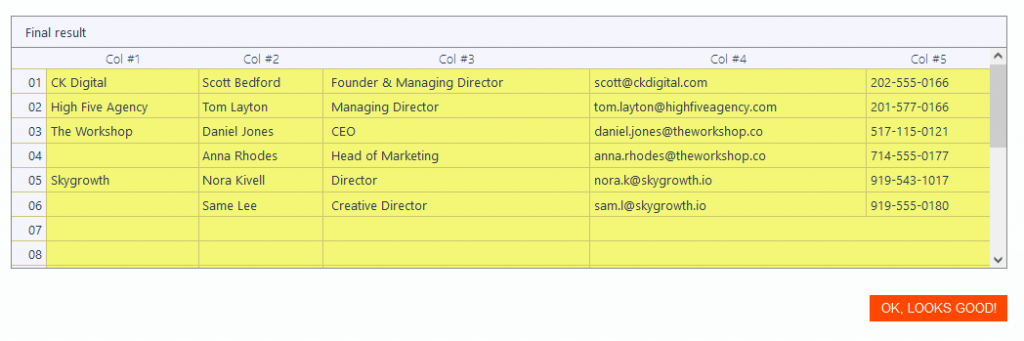
That’s it! The data is now parsed as intended. Don’t forget to scroll to the bottom of the page and click on ‘OK, Looks Good!’ on the right.
Type name for your parsing rules and click on ‘Validate & Save’ to save it.
Now, every time an email with an Excel spreadsheet is sent to Inbox 1, Mailparser will apply the parsing rules to rearrange and extract the data just like in this example.
Step 5: Send your parsed data to your application of choice
Your data is ready to be sent where it needs to go – you’re almost done!
Mailparser uses webhooks, an automatic method of transferring data from one location to another, to send the data parsed from Excel to the third-party APIs or web applications that you already use. For this example, we want to send the data to Google Sheets.
But first, be sure to have a spreadsheet in your Google Drive that will serve as the destination for the data. The header row should correspond to the parsed data:
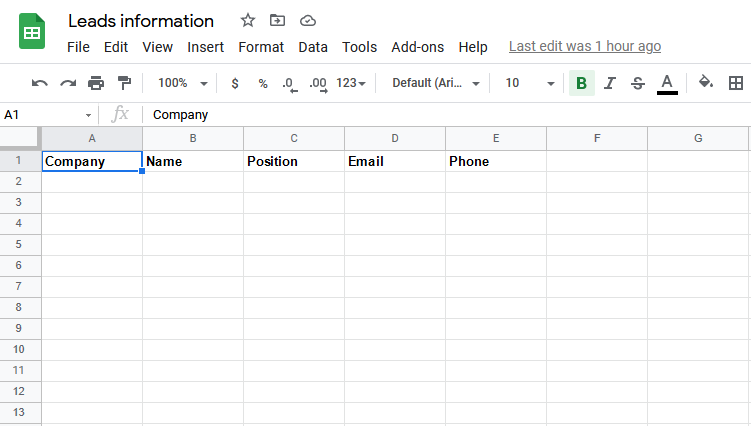
Make sure that the cells in the header row don’t have special characters; otherwise the corresponding column won’t be able to populate.
In Mailparser, go to ‘Integrations’ and click on the button ‘Add New Integration’ on the right.
Select the integration you want to send the data to, which in this case is Google Sheets.
Next, what you need to do in this screen is to add your Google account, the spreadsheet where you want the data to be sent, and the worksheet where you want the data to show up.
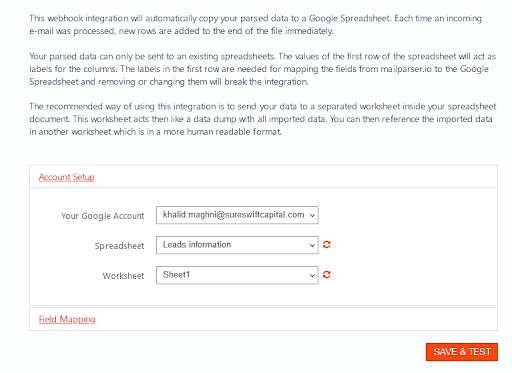
But don’t click on the orange button yet. Instead, click on ‘Field Mapping’.
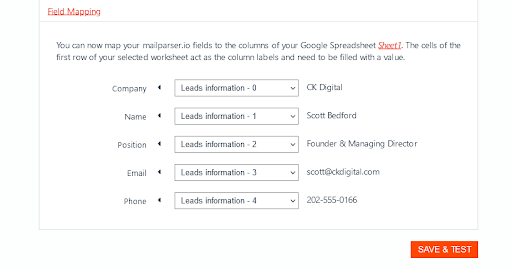
You can see the contents of the header row listed on the left. All you have to do is to set each column of the parsed spreadsheet to the one that fits it in the Google spreadsheet. Pick a column from each drop-down list and you will see a preview of the corresponding data on the right. Once you make sure everything is in order, click on ‘Save & Test’.
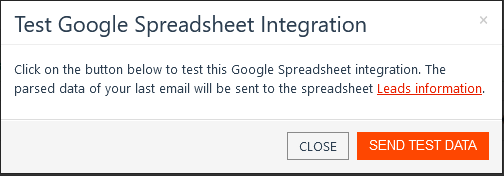
A pop-up window will ask for confirmation. Click on ‘Send Test Data’ and go to your Google spreadsheet to see the result:
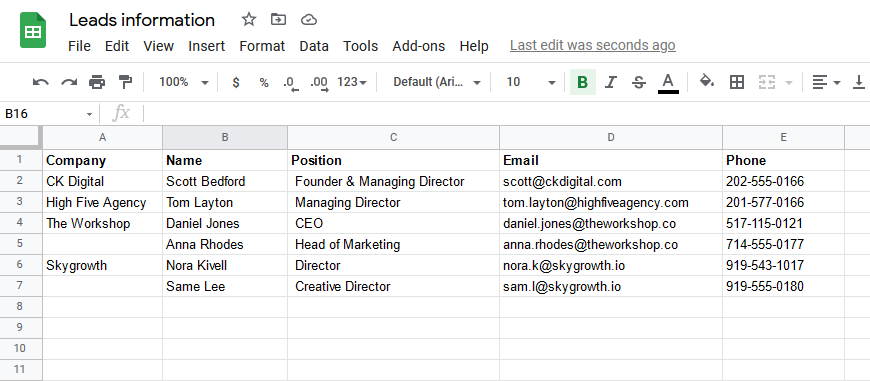
And that’s it! Your data is now parsed and displayed exactly how you want it.
As you can see, parsing data from Excel using Mailparser is simple and requires no technical skills. It’s simple a matter of knowing where to click, which this guide has just walked you through step by step.
Remember that you can set up your inbox to automatically process all incoming emails by following the parsing rules you set. So what would take hours upon hours to do manually can now be achieved in minutes!
Imagine how many man-hours and money your business can save by automating this data entry workflow. Parsing data from Excel with Mailparser makes the process seamless and accurate – once your parsing rules are set and tested, you won’t have to worry about human errors that cause delays and cost money.
Try it free. No credit card required.
You can export your parsed data to any API or web-based application that you already use. This could be:
- Google Sheets
- Zapier
- Slack
- Salesforce
- Trello
- Etc.
You can see the full list of integrations here.
A Few Companies that Rely On Mailparser
Many companies are relying on Mailparser to quickly and accurately parse data not only from Excel, but other sources as well. Let’s take a look a few of them:
- Atlanta Green Maids struggled for years with manual data entry, losing countless hours to feed customers orders to their CRM software. After discovering Mailparser, the company became able to effectively automate the process. Now, orders placed on their website are sent to an inbox where Mailparser processes the data and sends it to the CRM software via Zapier.
- Movinga, a startup operating in the moving industry in Europe, receives large amounts of leads regularly. Using Mailparser has allowed Movinga to quickly extract lead information from emails and use it to convert leads faster than the competition.
- United Worx is a web development company that relies on Mailparser to grab emails, clean the html, extract lead information, and send it to a CRM solution used by their clients. Being able to send hundreds of leads per month to clients has become a key selling point for United Worx.
FAQ
What is email parsing?
Email parsing is an automated process that extracts data from an email’s body and/or attachments. You can structure data however you want and then send it to any application you use. Email parsing saves your business a lot of time and money, and allows your team to focus on higher-value tasks.
How do I use Mailparser?
Simply put, you create an inbox where you will send your emails. You then create parsing rules to structure the data as needed. Lastly, you set up your business email to forward emails and attachments to Mailparser.
Using Mailparser is quite simple and requires no technical skills. The UI is user-friendly and instructions are provided along the way.
How do I save an email as a spreadsheet?
Follow the instructions provided in this article to convert your email to a spreadsheet.
How do I extract specific data from Excel?
Send your Excel spreadsheet to your Mailparser inbox and set parsing rules that isolate the data you want. Visit our support center for more details on how to use Mailparser. If you need help, contact our support team and they will be in touch shortly.