
How to Forward Emails in Gmail and Outlook (2026 Guide)

Last Updated: June 10, 2026
How to Forward Emails in Gmail and Outlook in 2026

Table of Contents

Automatically Extract Data From Emails

Capture data from incoming emails and send it to spreadsheets, Google Sheets, databases, APIs, integration services, and more.

No credit card required

If you’re wondering how to forward emails in Gmail, you’re not alone. Forwarding emails to another address is a common task, whether you’re switching accounts, sharing emails with a colleague, or sending them to a tool like Mailparser. Mailparser is an email parser that automatically extracts data from emails and attachments, allowing you to eliminate data entry and automate workflows.

Many of our users asked us over the years how to forward multiple emails in Gmail to their Mailparser addresses. We have updated this blog post to reflect the current Gmail interface and forwarding process in 2026. We’ll show you how to forward both new emails and existing emails in Gmail.

In case you’re wondering how to do this in Outlook, you’re in luck: we also cover how to forward multiple emails in Outlook — both the web and desktop versions. Let’s begin.

Capture Data from Emails Effortlessly

Save countless hours of tedious data entry and streamline your workflows.

No credit card required.

How to Forward Emails in Gmail Manually

To forward multiple emails in Gmail manually, you have two options.

Option 1: Forward email in bulk manually

The simplest way to forward emails is to select them, right-click, and then click on the ‘Forward’ button. Gmail will open a separate draft for each email. So you copy and paste the recipient’s email address in each draft and hit ‘Send’.

Option 2: Forward emails as attachments in one message (still manually)

Alternatively, you can forward multiple emails as attachments in one email. You can do this in two ways:

  1. Select the emails, right-click, and select ‘Forward as attachment’.
  2. Create a new email, then drag and drop the emails into the message window.

With that said, forwarding emails manually can be time-consuming. Plus, you might forget to do it, or miss some emails in the selection…

A more efficient method is to use the built-in features of Gmail to create a filter that automatically forwards new emails based on pre-set criteria.

How to Forward Multiple Emails in Gmail With a Filter

First, it should be noted that this method isn’t available on the Gmail mobile app, so you’ll need to use a computer.

Now, here is how to forward emails in Gmail using a filter. Follow these steps:

1. Set up a forwarding address

In Gmail, go to ‘Settings’ then click on ‘See all settings’.

Here, go to the tab ‘Forwarding and POP/IMAP’, then click ‘Add a forwarding address’.
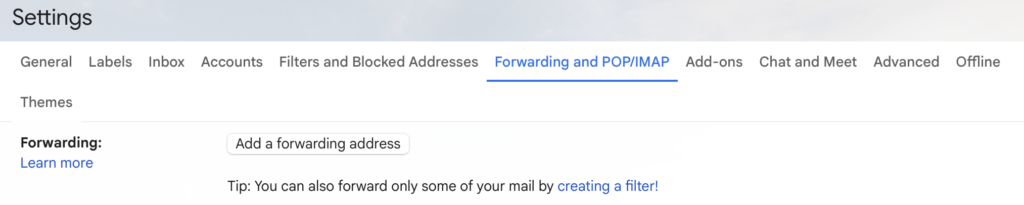
Add a Forwarding Address in Gmail

Enter the email address and click ‘Next’. You’ll see a pop-up asking you to confirm; click ‘Proceed’.

2. Verify the forwarding address

Next, Gmail will send a confirmation link to the address you added.

Go to that address’s inbox, click on the confirmation link, then, in the page that opens, click on ‘Confirm’.

Now your forwarding address is verified. It’s time to create a filter.

3. Create a filter

Let’s return to the Gmail settings. This time, click on the ‘Filters and Blocked Addresses’.

Here, click on ‘Create a new filter’.
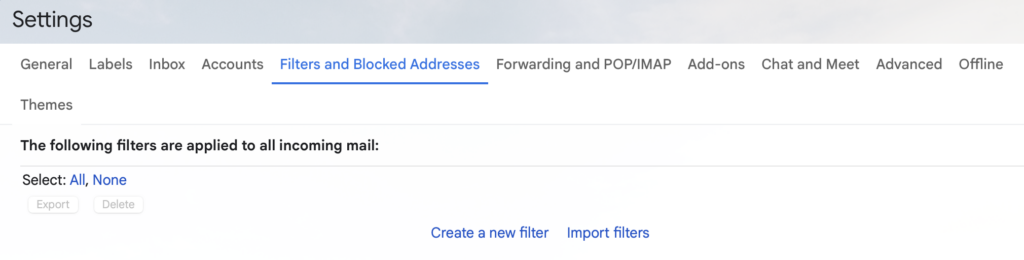
Create New Filter in Gmail

As a first step, you need to define search filters that identify the emails you want to forward.

In the search form that opens, add search filters such as the address that sends you the emails you want to forward (assuming it’s always the same address), the subject line, specific words in the emails, etc.
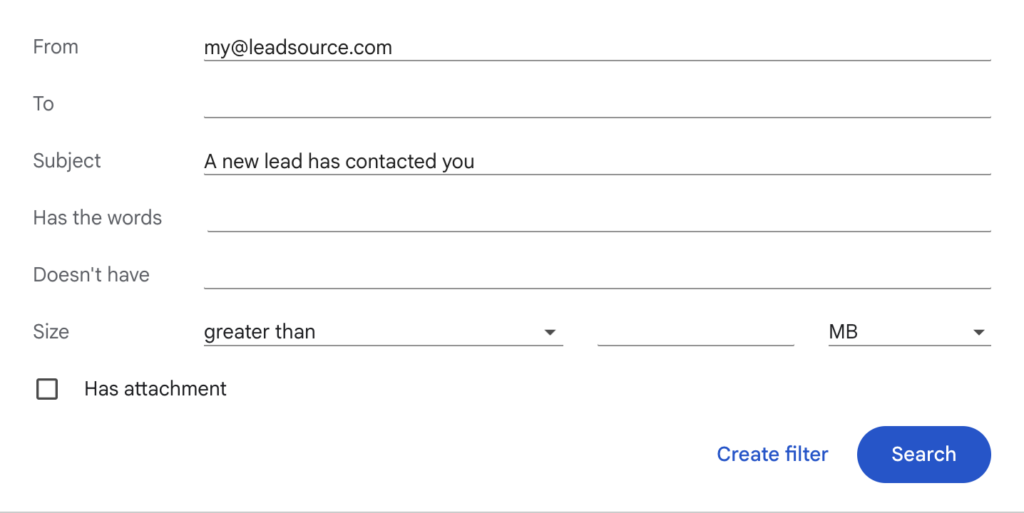
Gmail Filter Search Filters

If you already have some similar emails in your inbox, Gmail can show you which emails would match your filter criteria. Just click on the Search button at the bottom right, and a list of matching emails will appear.

When you’re done adding the search filters, click on ‘Create filter’.

Gmail will bring you to a new form where you choose what you want to do with the matching emails. Check the box ‘Forward it to:’ and choose your forwarding address.
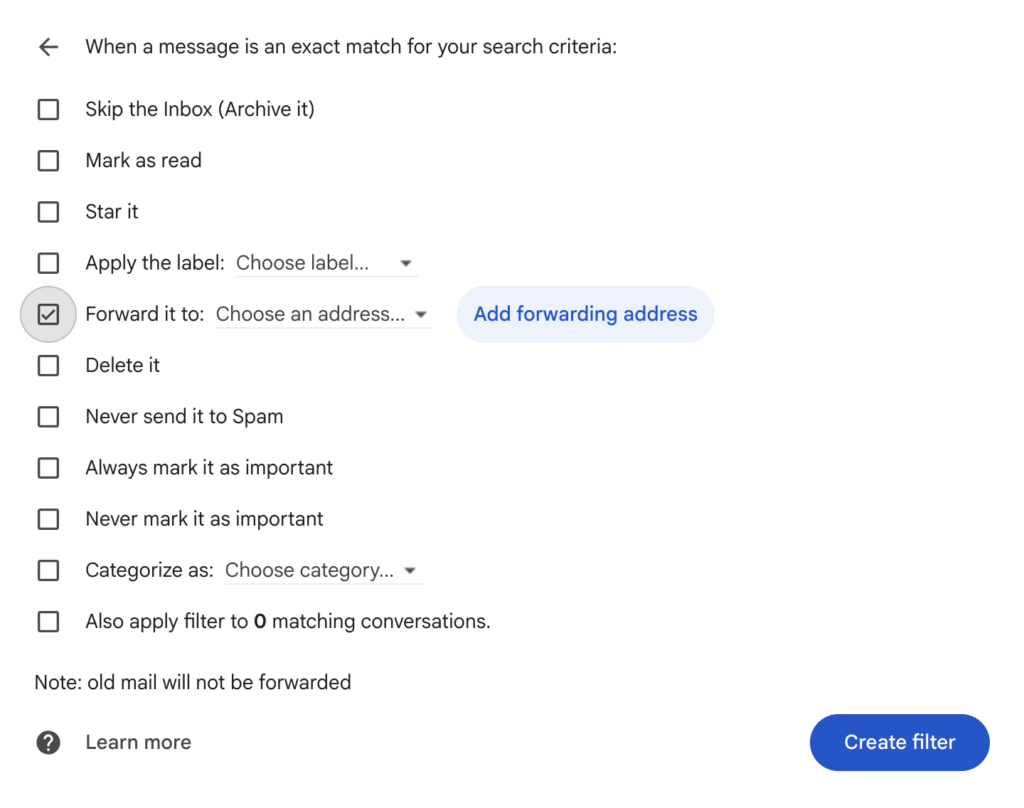
Forward Matching Emails

Lastly, click on ‘Create filter’.

Congratulations! Your filter is now active.

Now, whenever the filter detects matching emails and forwards them to the forwarding address, Gmail will notify you with a message at the top of your inbox.

Please note: If you forward your emails to your @mailparser.io inbox, you also need to click on the activation link. You will find the email containing the link inside your ‘Incoming Emails’ list. Click on it, choose ‘Original Email’ and click on the link. This will activate your forwarding filter.

For more details on how to forward emails in Gmail to your Mailparser inbox, please read this article on our Knowledge Base.

Capture Data from Emails Effortlessly

Save countless hours of tedious data entry and streamline your workflows.

No credit card required.

Can You Forward Old Emails in Gmail?

Gmail’s auto-forwarding filter applies only to new emails. If you want to automatically forward existing emails, there are a few ways to do it.

Use a third-party Gmail extension

One option is to use a Gmail extension such as Multi Email Forward by CloudHQ. This extension can bulk-forward emails to another address. This is useful if you’re migrating to a new email account, creating a backup, or sending historical emails to Mailparser for email data extraction.

Keep in mind that third-party extensions may require additional permissions to access your Gmail account. So be sure to review the extension’s permissions and pricing before installing it.

Use a Google Apps Script

If you’re comfortable with using a more technical solution, you can use a Google Apps Script. Apps Script can automatically forward messages matching specific criteria: sender, subject line, date range, label, etc.

Essentially, you write a script, add it to new project in Google Apps Script, authorize Gmail access, and set a schedule for automatic Gmail forwarding (for example, once a day at 10 AM).

This Google resource provides some instructions on how to make a script to forward messages.

So this is how to forward emails in Gmail manually, with a filter, or through an extension or script. We recommend using a filter since it automates Gmail forwarding and doesn’t require technical knowledge.

How to Forward Multiple Emails in Outlook (Both Web and Desktop)

If you happen to use Microsoft Outlook, you’re still at the right place! You can forward emails to another address in a few ways.

Forward existing emails manually

If you want to forward a large number of existing emails, one way to do this is to move them to a dedicated folder and then apply a forwarding rule to that folder. 

Forward emails in a folder with a rule:

  1. Create a new folder in Outlook.
  2. Locate the emails you want to forward and move them to the folder.
  3. Go to ‘Rules’, click on ‘Manage Rules & Alerts’, then create a new rule.
  4. Choose the option to apply the rule to messages you receive, then select ‘Forward it to the people or public group’ as the action.
  5. Enter the forwarding email address and save the rule.
  6. Run the rule on the emails already stored in the folder to start forwarding them.

Keep in mind that by using this method, you will have to manually locate, select, and move the emails you want to forward to the folder before you can run the rule.

So you might be more interested in how to automatically forward new emails in Outlook to the address you want.

How to auto-forward new emails with a rule in Outlook’s web version

If you use Outlook’s web version, follow these steps:

  1. Go to ‘Settings’.
  2. Select ‘Mail’ > ‘Rules’ > ‘Add new rule’. Give a name to your rule.
  3. Add a condition (e.g., from a sender)
  4. Add the action ‘Forward to’ and enter the address you want.
  5. Sign in and verify your account to enable this rule.
  6. Click ‘Save’.

With this rule up and running, new emails that match the criteria you set will be automatically forwarded to the email address you want.

How to auto-forward new emails with a rule on Outlook Desktop

In case you use the Outlook desktop app, follow these steps instead:

  1. Go to your inbox and click on the ‘Home’ tab.
  2. Click ‘Rules’ > ‘Manage Rules & Alerts’. 
  3. Click ‘New Rule’ > ‘Start from a blank rule’ > ‘Apply rule on messages I receive’. Click ‘Next’.
  4. Select the condition, e.g., ‘from people or public group’, add the sender, and click on ‘Next’.
  5. Select the action ‘Forward it to people or public group’, add or type the forwarding address, and click ‘OK’, then ‘Next’.
  6. Set exceptions if you want, then click ‘Next’.
  7. Give a name for your rule and make sure to check the option ‘Turn on this rule’. You can also check the option ‘Run this new rule on messages already in “Inbox”‘.
  8. Click ‘Finish’ then ‘OK’.

Your rule is now active and will automatically forward emails that match the set conditions to the address you specified.

For more details on how to forward multiple emails in Outlook, feel free to read this article on our Knowledge Base.

In Conclusion

You’ve now learned how to forward emails in Gmail or Outlook. Choose the method that suits you best and start forwarding emails in Gmail or Outlook to another email address, quickly and without mistakes.

If those emails contain important data that you need to enter into a spreadsheet, database, cloud application, or API, consider using Mailparser. Our email parsing tool helps you extract data from emails (whether in the subject line, sender, metadata, body, or attachments) and send it to your business tools. By doing so, you save the hours of data entry work and build automated workflows that boost productivity across your organization. For instance, you could route new leads to your CRM or add new invoice records to your ERP.

If you’re ready to boost your workflow efficiency, sign up for a free trial and discover the efficiency of email parsing.

Capture Data from Emails Effortlessly

Save countless hours of tedious data entry and streamline your workflows.

No credit card required.

You Might Also Like

Automatically Extract Data From Emails

Capture data from incoming emails and send it to spreadsheets, Google Sheets, databases, APIs, integration services, and more.

No credit card required