Does your business feel adrift in a sea of incoming contact requests, offline chats, and email leads? If so, it’s time to upgrade from the endless task of manually entering customer data to simple, speedy data automation. Rather than juggling hundreds of customers’ valuable information by hand, you can automate customer emails, organizing them and turning them into an effective email marketing campaign.
By using Mailparser to extract and parse customer data, you can transform a messy inbox into an organized email marketing system that will save you major time and money. And you won’t have to waste precious time relying on tiresome manual input ever again.
With Mailparser’s versatile data parsing tools, our customers process between 50 to 200,000 emails monthly. Read on to learn five ways Mailparser helps businesses supercharge their email marketing through automated email data parsing.
Automate Your Customer Emails with Mailparser
Streamline your email marketing processes with Mailparser and save hours of busy work,.
no credit card required
Why Prioritize Email Marketing?
Studies show it’s 5 times as expensive to acquire a new customer than to keep one you already have. Businesses lose out on potential sales when they don’t cultivate relationships with current customers. By utilizing email communications with your customer base, you benefit by:
- Saving money – Email marketing is one of the most affordable ways to effectively showcase your business or services for your audience. Email marketing software like Constant Contact and Mailchimp make it easy to automate customer emails by creating attractive email campaigns that generate sales and maximize brand visibility to your customers.
- Personalizing the customer experience – McKinsey & Company recently reported that 71% of consumers have come to expect personalized interactions from businesses. Even more, if they didn’t receive this type of communication, 76% felt frustrated about it afterward. With so many customizations in place, it’s no longer a major task to personalize your business’s email marketing. Furthermore, this small step can go a long way in boosting customer enthusiasm and loyalty.
- Reaching your target audience more effectively – A whopping 77% of marketers have seen an increase in engagement over this last year. Email marketing is alive and well, so take advantage of this simple way to reach your primary audience.

5 Powerful Ways Mailparser Automates Customer Emails
Here’s how you can utilize Mailparser to automate customer emails, boost sales, and create a stronger customer experience.
1. Send auto-replies
If you receive leads through email, you can automate your response by extracting data from those messages and using it to send a new outbound email. This method is perfect for welcome emails, birthday shout outs, and other messages with relevant information for your customers.
2. Build Organized Contact Lists for Promotions
Mailparser’s data extraction tools help you pull important contact information from incoming emails and automatically structure that data based on your personalized Parsing Rules. If you’re looking to organize and keep track of a growing customer base, you can use Mailparser to quickly automate your contact list, ensuring that vital customer information gets normalized and compiled with uniformity.
3. Automate Delivery and Order Status Updates
When customers make a purchase order, Mailparser allows you to automatically send email notifications to them about their order status. For instance, every time an order comes through, you can trigger a shipping confirmation email to be sent out immediately by using parsed email data from your carrier. Plus, if you use multiple carriers, you can parse all generic tracking emails to be sent from your own business to increase brand consistency and visibility.
4. Create purchase orders
If your current sales application doesn’t automatically create purchase orders and invoices, Mailparser has a solution. Through its simple Google Sheets webhook, you can automate printable versions that can be sent via email, so customers can receive, process, and print invoices.
5. Run Fully Automated Email Campaigns
Through Mailparser, you can extract and categorize customer email addresses and send them via webhook integration to a cloud application like Zapier. There, they get processed and sorted, so they can be delivered to an email marketing app like Mailchimp or Constant Contact. In other words, you can fully automate an email marketing campaign for your business.
Because Mailparser integrates with over 1,500 cloud-based apps, it’s the ideal solution for automating any data entry required for a variety of customer interactions. If you’re looking to grow and cultivate client relationships through email marketing without adding additional time spend, Mailparser is the affordable app that will make all the difference.
Reach More Customers Faster with Mailparser
Boost your email marketing processes with Mailparser’s data extraction features. Scale your business the smart way through Mailparser.
no credit card required
How to Automate Customer Emails with Mailparser
Step 1: Create a Mailparser account
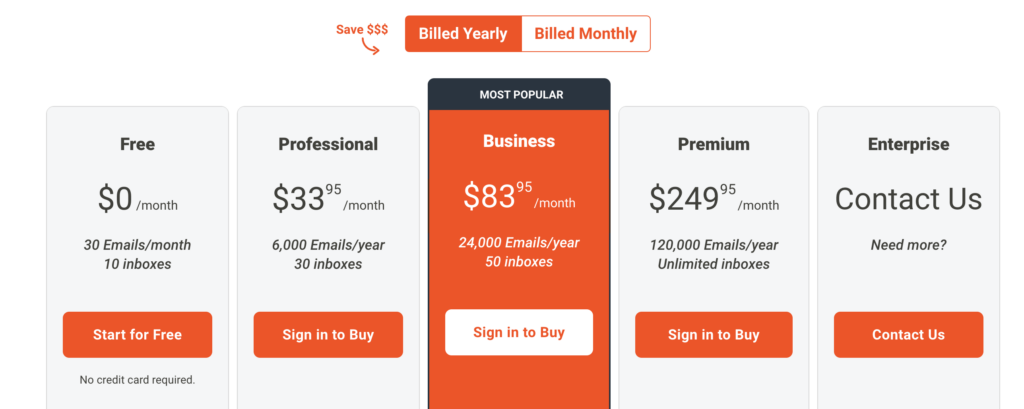
First, sign up for a Mailparser account. You can go for the Free Plan which lets you parse up to 30 emails per month, or choose a free trial of one of the paid plans so you can parse large numbers of emails.
After creating your account, we suggest you provide a few details about your business, like your industry and how many emails you want to parse, so that Mailparser can help you create the most optimized email parser.
Step 2: Create an inbox
Next, you want to create an inbox where you will receive customer emails. Note that you can create several inboxes for different types of emails. For now, just click on the button ‘Create Your First Inbox’.
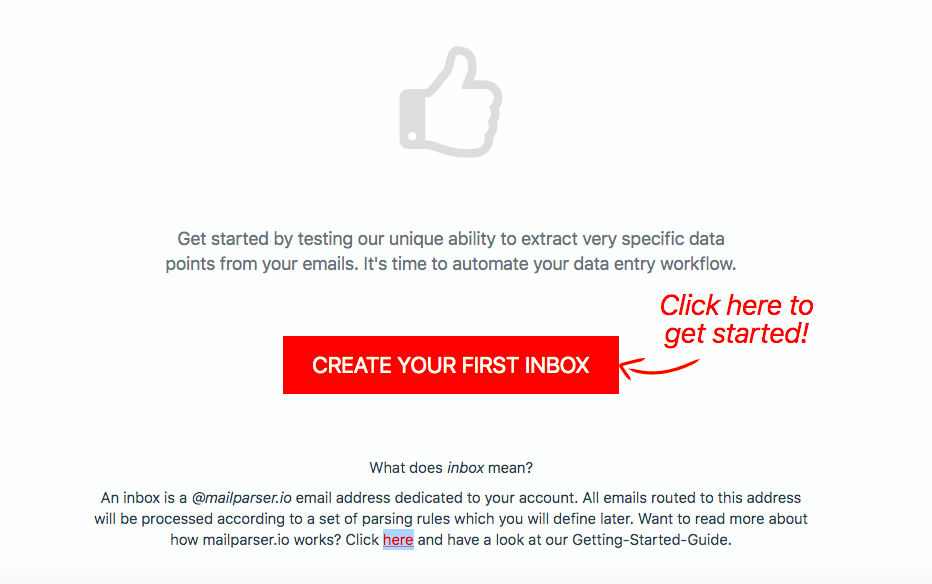
Type a name for your inbox, confirm, and Mailparser will generate a unique email address for that inbox.
Step 3: Send a customer email to your Mailparser inbox
To build your email parser, you need at least one sample email to use as a base for creating Parsing Rules (more on that in a bit). Choose a customer email from your inbox and forward it to your Mailparser inbox. If you can forward a few emails of the same nature, that’s even better.
Now, in the left-hand side panel, click on ‘Emails’ and you’ll see your sample email there.
Step 4: Create Parsing Rules
Parsing Rules are the instructions you give to Mailparser so that it knows where to search for each data field and how it should be formatted during the parsing process. So Rules are at the core of automating data entry. Thankfully, they are quite simple to create as we’re about to see.
Use the Automatic Setup
To create your first Parsing Rules, go to the ‘Rules’ section and select ‘Try Automatic Setup’. Mailparser will try to automatically create Parsing Rules based on the data within your sample email(s).
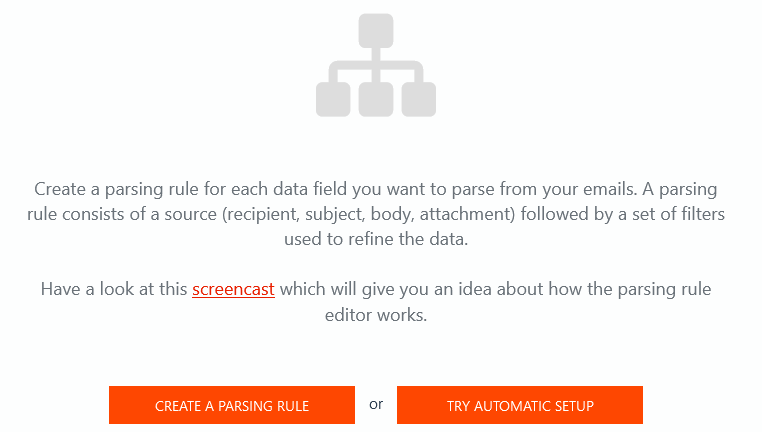
In this example, the sample email is a new customer order for an online store that sells workout clothes. Let’s say you want to extract the information related to that customer so you can add it later to your customer database. Mailparser will try to create Parsing Rules based on the data within the sample email. Let’s take a look at the result:
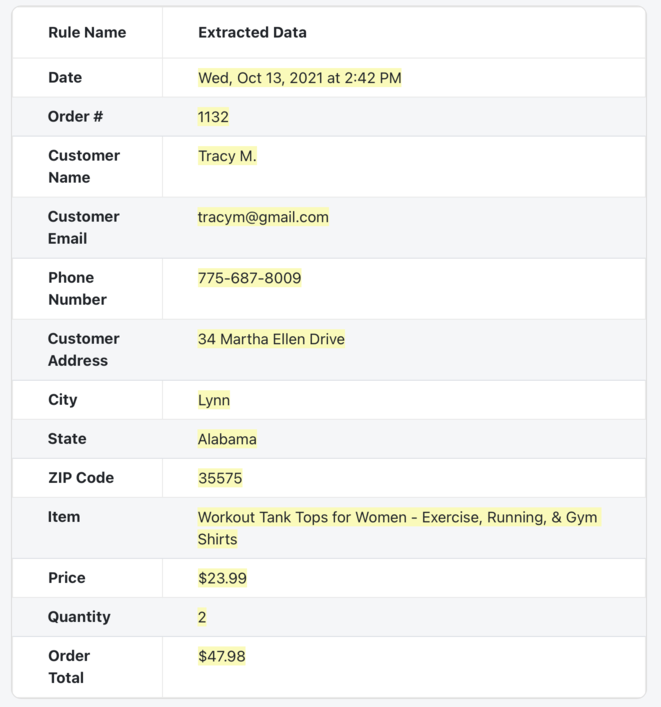
Since the sample email is straightforward in its presentation and text, it was easy for Mailparser to recognize each data field and isolate it from the others. This automated process took only a moment and we don’t even need to add anything to the Rules. That’s convenient!
Scroll down and click on ‘Start with this Template’. Mailparser will exit the Rule editor and take you back to the Emails section where the sample will be re-parsed according to the Parsing Rules we set. You can check the parsing results by clicking on the email.
Note that you can always go back to your Parsing Rules in the Rules section to rearrange their order as well as edit, duplicate, or delete any of them. You can also add as many new Rules as you want.
To illustrate, let’s re-create the Item Rule manually.
Add a Parsing Rule Manually
In the Rules section, click on ‘+ Add Parsing Rule’ under the last Rule.
Next, you need to select the data source within the email. In this case, it’s simply the email’s body. So select ‘Body’ followed by ‘Plain Text’. The editor will then isolate all the plain text data from the email.
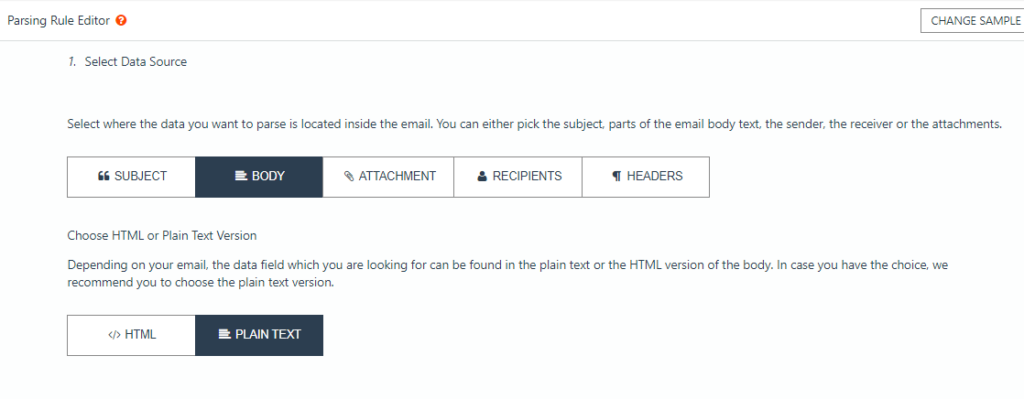
Now, scroll down a little bit and click on the button ‘Add Text Filter’. Move your cursor to ‘Set Start & End Position’ and select ‘Find Start Position’.
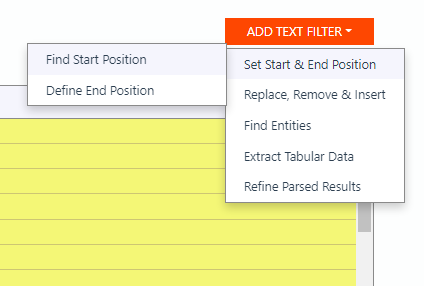
The first option to find the start position is ‘Text match: after’. In the text field right next to it, type ‘Item: ’. Make sure to add the blank space that comes before the item description.
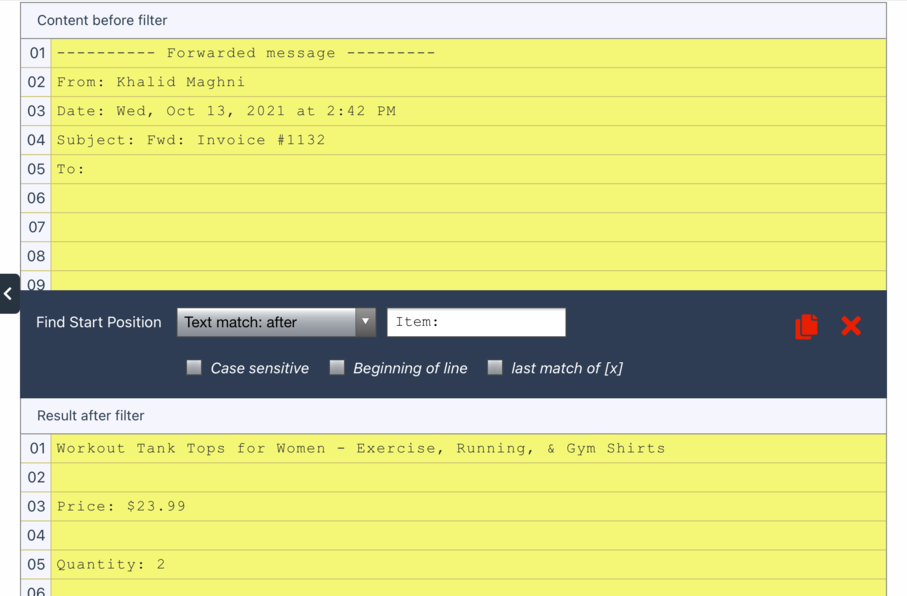
You can see the result of applying the filter: all the data that comes before the item description has been removed. Now we just need to remove the data that comes afterward.
To do this, add a new text filter, but this time, select ‘Define End Position’ instead of ‘Find Start Position’. The first option for this filter is ‘End of line’, and it’s set by default, so you don’t need to do anything here—the filter is applied automatically.
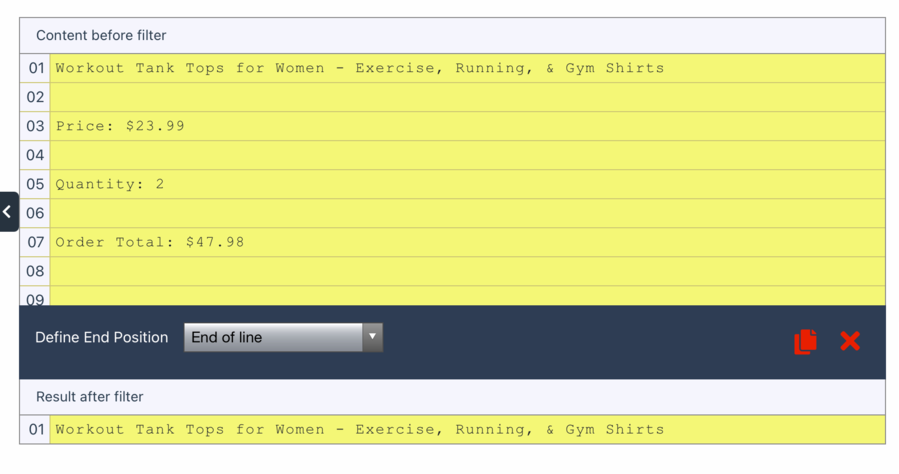
Scroll down and click on ‘OK, Looks Good!’. After that, type a name for your Rule, like ‘Item Description’ then click on ‘Validate & Save’. You’re Done!
So as you can see, creating Parsing Rules is very simple. The Automatic Setup can create Parsing Rules for you, and from there you can create additional Rules by isolating each specific data field with filters.
Step 5: Choose where you want your data to go
Option a: download a file of your parsed data
If you want to download your parsed data, go to ‘Downloads’ and click on ‘Create First Download Link’.

Select the format you want: XLS, CSV, JSON, or XML. Type a name for your file then scroll down to click on ‘Save’. Mailparser will generate the download link in the blink of an eye. That’s it!
Option b: send your parsed data to a cloud app
Alternatively, and perhaps more interestingly, you can send your data to a cloud app, either directly (e.g. Google Sheets, Zoho CRM) or via a third-party integration platform like Zapier. This way, any time your Mailparser inbox receives new customer emails, they get parsed and the data automatically goes to a specified location on your cloud app, thus streamlining most of if not your entire data entry workflow.
To create an integration, go to ‘Integrations’ and click on ‘Add New Integration’.

Let’s say you want to use Zapier to create ActiveCampaign contacts from parsed emails. To do this, choose Zapier from the integration options and select the ‘ActiveCampaign + Mailparser’ Zap.
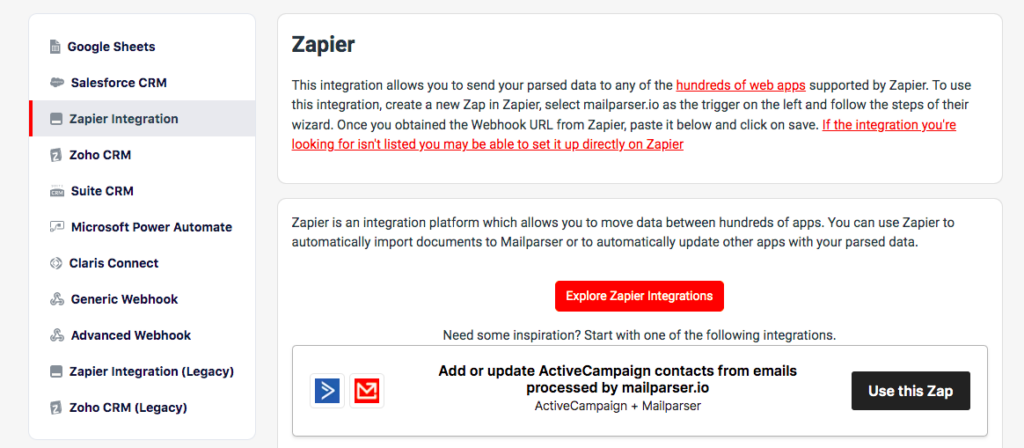
Log in to your Zapier account and create a Zap where the Trigger is any newly parsed email and the Action is creating a contact with data fields taken from parsed emails.
So that’s all you need to do to automat customer emails with Mailparser. The whole process of creating your own customer email parser is straightforward, requires no technical knowledge, and can take as little as 10-15 minutes to complete.
Mailparser Use Case
Many businesses use Mailparser to automate customer emails in various ways. Every time you need to enter customer data sent by email, you can let Mailparser take care of that for you. Here is a one use case:
“We are currently using MailParser.io in 3 different ways:
Loading web enquiries to our CRM (Zoho): Our web forms can’t connect directly to the CRM so we generate an email every time the enquiry form is completed, MailParser.io picks the information & send it to our CRM for handling`
Back up new ‘bookings’ registered via Zoho onto Google Sheets: All bookings made & registered on our CRM trigger an email which Mailparser.io parses & send relevant info to a Google Sheet for backup / reporting point of view
Process insurance purchase notifications from our partner: We get notified by email of all our clients’ purchases with all details on a PDF attached to it. Thus, Mailparser.io allows us to save all of those as backup into Google Sheets & send all relevant info to Zapier where we have a Zap that notifies the right consultant about their client’s purchase. This also updates our CRM with that info that might become useful at a later stage should the client contact our consultant with an emergency issue.
All of those processes above either didn’t exist, so we’re now providing extra benefits to our employees and/or clients, or were very manual – MailParser.io allows us to automate the handling of the large amount of information generated during our customer’s journey from enquiry to purchase & travel.”
Julien – The Giltedge Group
Furthermore, beyond just customer emails, you can use Mailparser for any workflow that involves data entry. You can read more case studies here.
Mailparser FAQ
What are the supported file formats for email attachments?
You can extract data from attached files in PDF, DOC, DOCX, XLS, CSV, TXT, and XML format.
Can I integrate Mailparser with my cloud app?
Yes. In addition to Mailparser’s direct integrations, you can connect your account to thousands of cloud apps via our Zapier integration.
Is Mailparser secure?
Yes. At Mailparser, we take data security very seriously. Your data belongs to you and we will never sell it or use it in any other way. We use bank level encryption and all servers are regularly updated with the latest security patches. For more details, please read our security statement.
Can I get started for free?
Please do! You can create a free account to parse up to 30 emails per month across 10 inboxes. All features are accessible from the get-go. If you want to parse a large number of emails right from the start, sign up for a free trial here.
Automate Customer Emails With Mailparser
If you’re looking to scale as a small business, it’s essential to create systems that will help you manage a thriving customer base. Consequently, setting up efficient and effective marketing processes will serve you for many years to come. When you automate customer emails through Mailparser, you save your employees time and provide your clients with a robust customer service experience.
Because of its versatility, Mailparser is an ideal addition to your business software. In short, it’s one tool that can save you endless time, while helping you to establish smart, reliable business processes.
To get started with Mailparser absolutely free, head to this link—no credit card required!
Reach More Customers Faster with Mailparser
Boost your email marketing processes with Mailparser’s data extraction features. Scale your business the smart way through Mailparser.
no credit card required

