
Forward Multiple Existing Emails in Outlook Manually
Outlook doesn’t let you forward multiple selected emails as separate messages with one click. However, you have two options:
- Forward several existing emails together as attachments in a single email.
- Create an Outlook rule to automatically forward future emails individually to another address.
Forward several existing emails together as attachments in a single email
Instead of forwarding emails one by one, you can send them together as attachments in one message. Simply do this:
- Select the emails – press and hold Ctrl (or Command on Mac), then click on each email. Alternatively, you can hold down Shift for a contiguous range of messages.
- Create a new email.
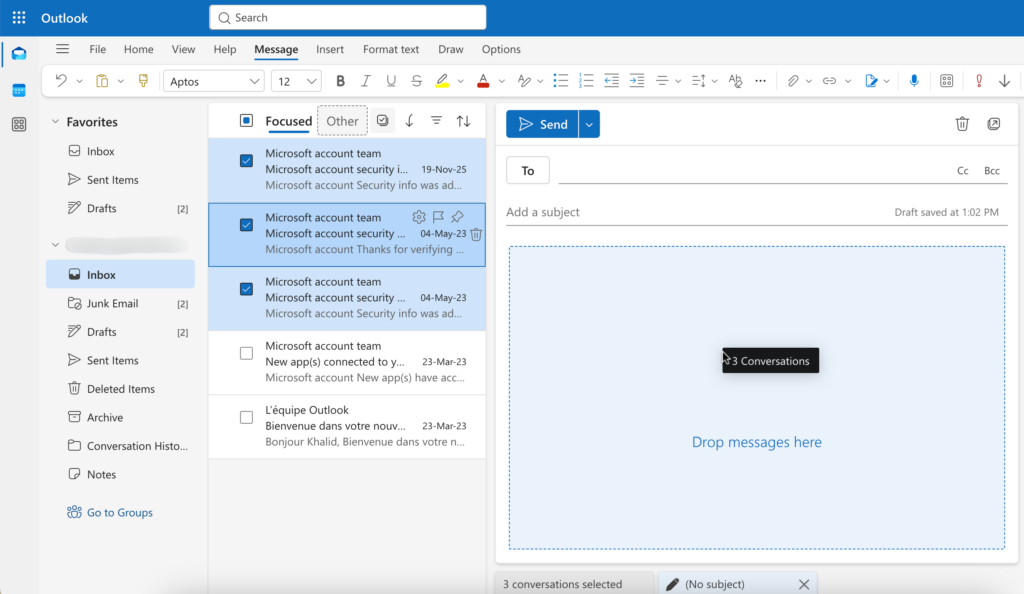
- Drag and drop the selected emails into your draft.
- Enter the address you want to forward to and hit ‘Send’.
On Outlook Web and New Outlook for Windows, drag-and-drop forwarding looks like this:
Alternatively, in the Desktop app, you can select the emails you want to forward, click on ‘Forward’ in the Respond section of the Home tab, enter the email address to send to, and click ‘Send’.
Now, while this approach can work, you may find it difficult to locate emails in your inbox over time, so it’s a good idea to create a folder for the emails you want to forward.
To create a folder, go to the Home menu, select ‘Move to’, type a name for your folder in the field ‘New folder name’, and click ‘Save’.
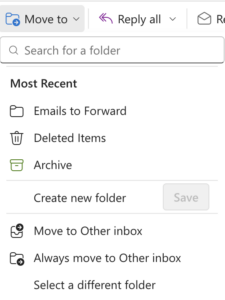
Having a folder helps you keep emails accessible in one place. You can enter the folder anytime, select emails, and forward them as attachments in one message.
However, you will have to repeat the Outlook email forwarding manually whenever you receive new emails.
So a better approach would be to set a rule that automatically forwards emails to a specified address. Here’s how to do it.
How to Forward Multiple Emails in Outlook Automatically With Rules
This method should work on the Outlook web app as well as the desktop apps, New and Classic. For this tutorial, we’re using the Outlook Web App.
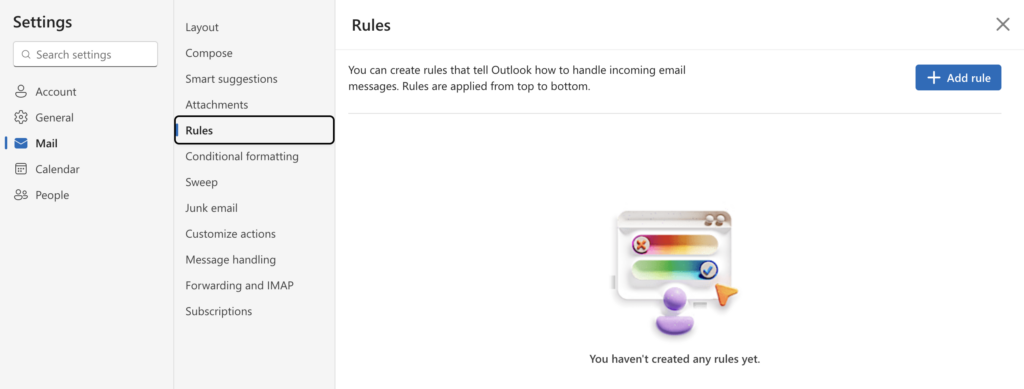
1. Create a rule in Outlook
In the Settings, go to ‘Rules’, click on ‘Manage Rules & Alerts’, then create a new rule.
2. Set up the auto-forwarding rule
The following screen is where you set up your auto-forwarding rule. Take a look:
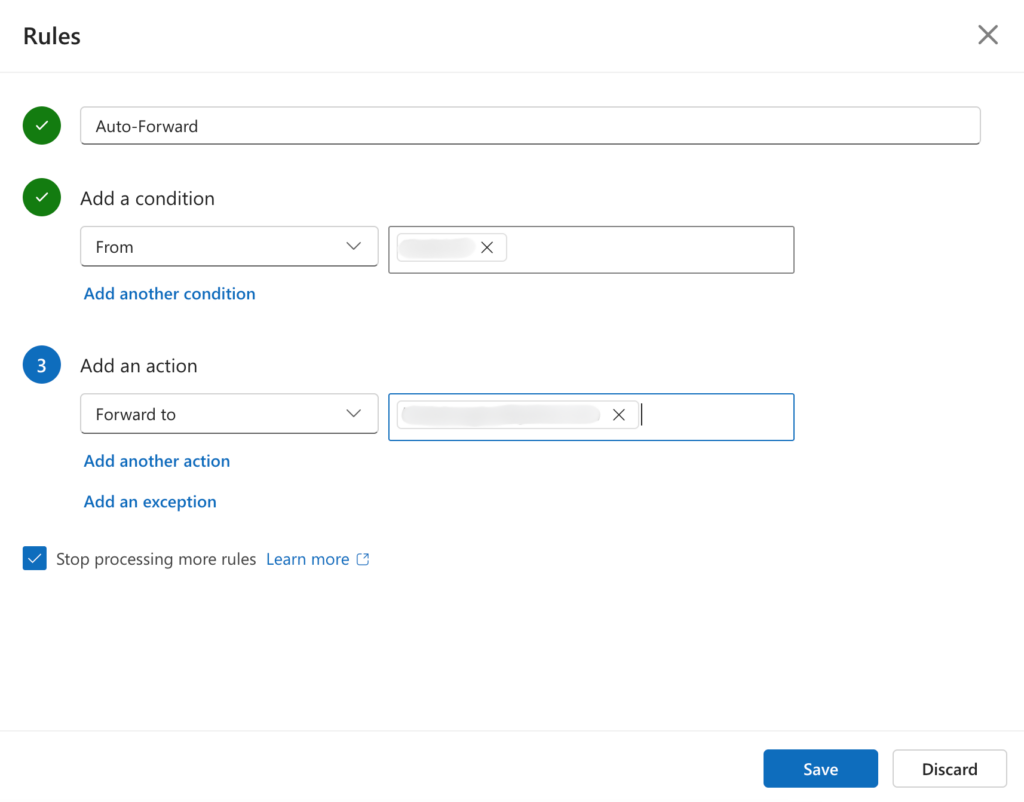
Let’s break it down.
First, type a name for your rule. Then, add a filter condition to determine which emails in your inbox should be forwarded. Outlook rules can filter by:
- Sender
- Subject
- Keywords
- Recipient
- Marked with importance or sensitivity
- Message size
- Etc.
For this example, we choose ‘From’, then type the email address that sends us the emails.
Feel free to add more conditions if you want.
Next, add an action. Choose ‘Forward to’ and enter an email address.
Be sure to sign in and verify your account to create this forwarding rule.
Lastly, click on ‘Save’.
Lastly, run the rule on the emails already stored in the folder to start forwarding them.
How to Auto-Forward New Emails With a Rule on Outlook Classic
In case you use Outlook Classic, follow these steps to forward multiple emails automatically:
- Go to your inbox and click on the Home tab.
- Click ‘Rules’ then ‘Manage Rules & Alerts’.
- Click ‘New Rule’ > ‘Start from a blank rule’ > ‘Apply rule on messages I receive’. Click ‘Next’.
- Select the condition, e.g., ‘from people or public group’, add the sender, and click on ‘Next’.
- Select the action ‘Forward it to people or public group’, add or type the forwarding address, then click ‘OK’ and ‘Next’.
- Set exceptions if you want. Either way, click ‘Next’.
- Type a name for the rule and make sure the option ‘Turn on this rule’ is checked. You can also check ‘Run this new rule on messages already in inbox’.
- Click ‘Finish’ and then ‘OK’.
That’s it. The Outlook Classic app will start automatically forwarding new emails to the address you specified.
This YouTube video showcases this setup process on the Outlook desktop app: