Exporting Shopify Orders Manually Can Be a Hurdle
There are several reasons you may need to export your Shopify orders:
- Create a backup of your customer orders
- Send daily reports to a fulfillment warehouse or center
- Send reports to suppliers
- Analyze customer, stock, and order data
- Move your data to another store or platform
As you can see, it’s important to keep Shopify data that’s structured and up-to-date.
To that end, your Shopify dashboard has an
Export function that allows you to save your orders as a report in CSV format. You simply go to your Orders page, sort and/or filter the orders you want, and click on the Export button at the top right. After that, you can either send that report to the person who needs it or open a third-party application then import it.
However, performing this simple task on a regular basis – like every day – can lead to issues. For instance, downloading a large file can take a lot of time, and by the time you finally save it, new orders will have been placed, making the latest report obsolete.
That is why automating your Shopify order workflow is the far more efficient option.
Why You Should Automate Your Shopify Order Workflow
Automation can go a long way to help you run your store smoothly. Specifically, you will be able to:
Forego manual data entry
Entering order data manually into your order report can create a bottleneck in your order workflow and detract you from other tasks. Moreover, this becomes a less and less viable process as you grow your Shopify store.
Prevent data entry errors
To err is human. When you rely on manual data entry, you should expect errors to occur. And incorrect information can have serious consequences. For example, you might ship to a wrong address, thus causing a delay in the delivery time and an inconvenience for your customer, so you definitely don’t want something like this to happen.
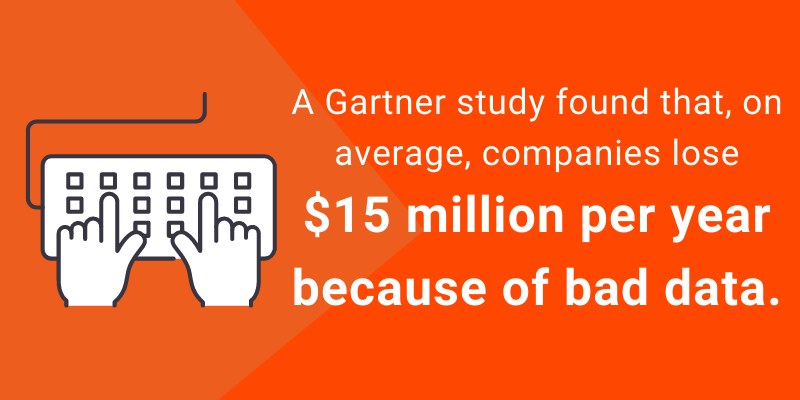
It’s actually estimated that the average annual cost of bad data is an
outstanding $15 million.
Automating your workflow will massively reduce human error. The data customers enter when they place orders will be captured and moved as is to the destination you want.
Streamline your Shopify order workflow
Thanks to automation, you won’t have to save multiple CSV files every day to keep up with the flow of new orders or edit your order report manually. This, in turn, allows you to send your order data to whoever needs it, whether that’s a supplier or an order fulfilment specialist, via communication channels like email and Slack.
You can therefore imagine the results: easier work for you, faster shipping, and happier customers overall.
Focus on more important tasks
When you automate the manual tasks in your Shopify order workflow, you and your staff will free up more time to focus on the other aspects of running your Shopify store, such as:
- Customer service
- Inventory management
- Marketing
Overall, automating your order workflow allows you and your team to provide better service and spend more time and energy on the strategic level of your business.
Process more orders without extra work
With automation, you won’t have to put in more time and effort to get more work done. Whether you receive 10 or 100 orders, the time needed to export them will remain almost the same.
As a result, you will be able to scale your Shopify business without feeling stressed about the additional amount of orders to process. Automation solves this, as Neil Patel explains in
his blog:
Yes, it’s easy to stay engaged with customers when you have a handful, but what happens when you have hundreds, thousands, and more? You just can’t be there for all of them.
– Neil Patel
This also means you won’t have to hire more staff to perform repetitive tasks for you – your automation tool has you covered.
So if automation sounds like the solution to your workflow challenges, your options are either developing an automation function or using a ready-for-use, no-code tool like Mailparser.
How Can Mailparser Help?
Mailparser is a no-code email parsing tool that extracts data from emails. You just send the emails you want to parse to your Mailparser inbox and it will accurately extract the data inside according to a set of instructions called Parsing Rules.
Additionally, you can connect Mailparser with a cloud app that you use, including Shopify, and have your data automatically sent there.
You might be wondering how an email parser can automate your Shopify order workflow. So here is how your workflow will look once you start using Mailparser
- A customer places a new order
- Your order notification email is routed to Mailparser
- Mailparser extracts the order data
- You receive the data in your desired destination
Let’s see a specific example of how to set up Mailparser to automate your order workflow.
How to Automate Your Shopify Order Workflow with Mailparser
Let’s see how you can automate your order workflow by using Mailparser. There are six steps to follow:
Step 1: Create a free Mailparser account
The first step is to sign up for a free trial Mailparser account. You won’t have to enter your credit card information and you can keep using your free account indefinitely.
Step 2: Create an inbox for Shopify orders
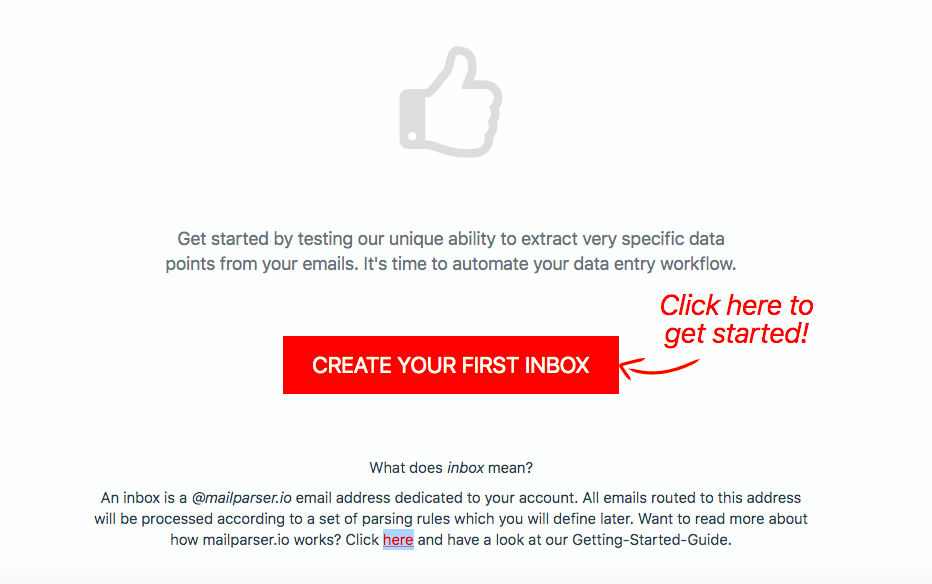
Mailparser allows you to create multiple inboxes (up to 10 in your free account) for different kinds of emails. As soon as you create your account, you will see a prompt to create your first inbox. Pick a name like “new order notifications” and confirm. Mailparser will create an email address for your inbox.

Step 3: Send an order notification email to your inbox
Head over to your business inbox and select one or several order notification emails. You will need these to set up Parsing Rules. Forward them to your Mailparser inbox then go back to your Mailparser account.
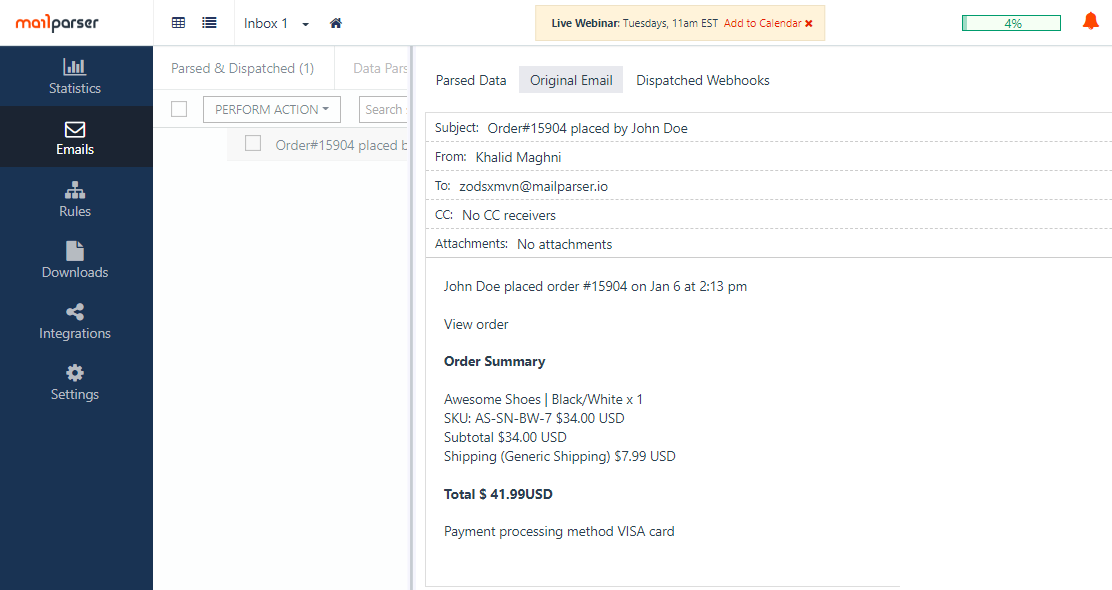
You’ll find the sample email in the ‘Emails’ section of your dashboard, under the ‘Original Email’ tab.
Step 4: Set up Parsing Rules
Mailparser follows Parsing Rules to identify and extract data from emails. You can set up pre-built Parsing Rules, create custom Parsing Rules from scratch, or use both to have Mailparser accurately extract all the data you want in a structured state.
Keep in mind that you only need to set up Parsing Rules once. After that, Mailparser will extract data from any number of order notification emails. Furthermore, you can always edit Parsing Rules.
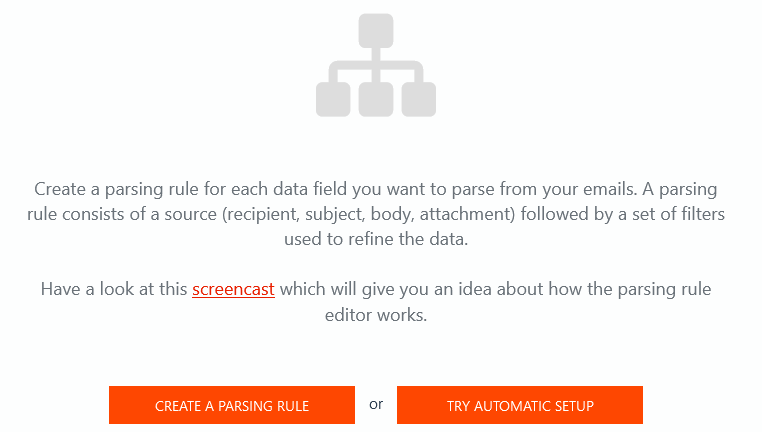
Go to the ‘Rules’ section on the left-hand side panel and click on the ‘Create a Parsing Rule’ button.
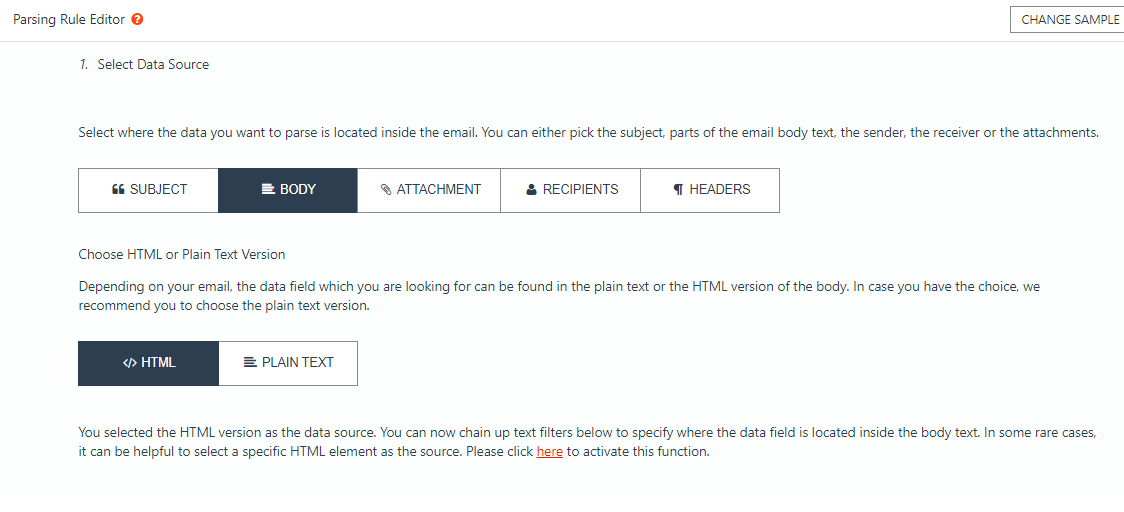
In the next screen, you have to select the data source. Make sure the source is set to ‘Body’ and ‘HTML’.
Create the first Parsing Rule
Scroll down to set your first Parsing Rule. You will see that Mailparser has gathered all the text data from the email. What you want to do here is to create a text filter that isolates the data you want, one by one.
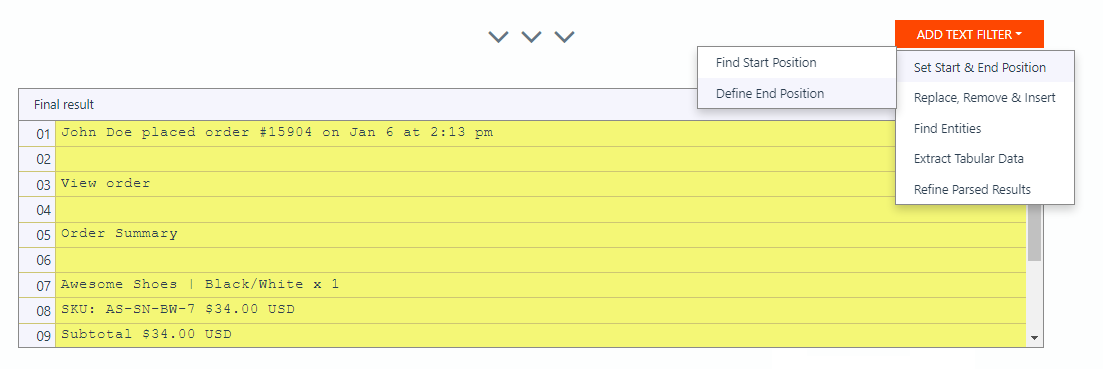
So for your first text filter, we want to extract the customer’s name. Click on the ‘Add Text Filter’ button on the right. Move your cursor to ‘Set Start & End Position’ and select ‘Define End Position’.
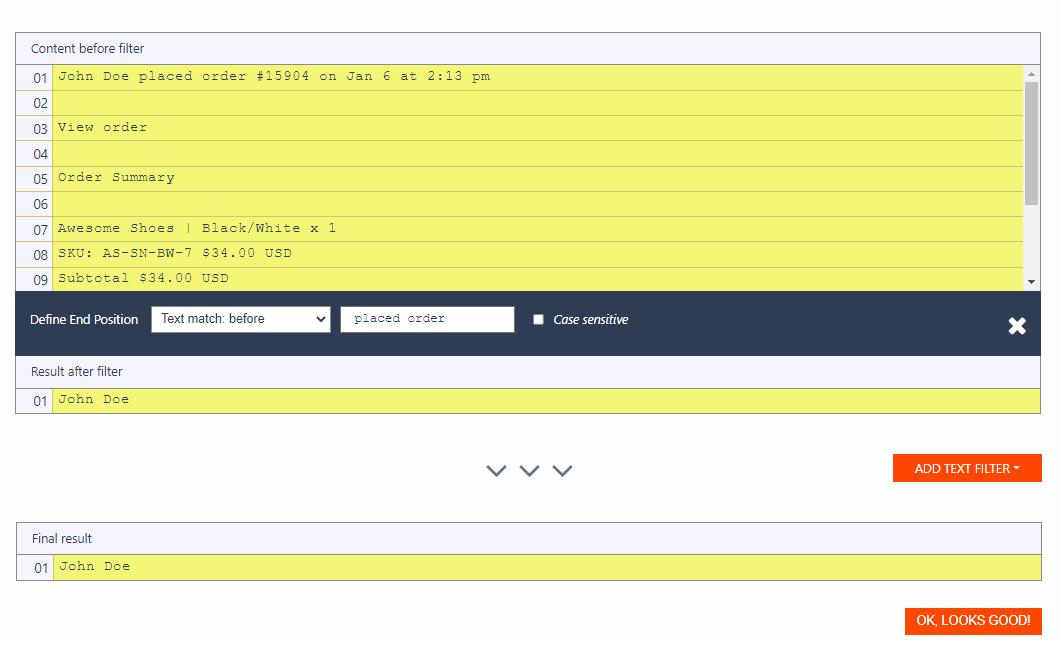
Scroll down a little bit and you’ll see a dropdown list titled ‘Define End Position’. Select the option ‘Text match: before’ and type “ placed order” since that’s the text that comes right before the customer’s name. Make sure to include the space after the customer’s name. Mailparser will remove all the data that comes after “ placed order” thus isolating the customer’s name.
Click on the ‘OK, Looks Good!’ button, type the name “Customer name” for this Parsing Rule, then click on ‘Validate & Save’.
Create the second Parsing Rule
You will be brought back to the Rules section. Click on ‘+ Add Parsing Rule’ to create a second Rule for the order number.
Once again, select ‘Body’ and ‘HTML’ as the data source and create two text filters, one for the text that comes before the order number and another for the text after it.
For the first filter, click on ‘Add Text Filter’, go to ‘Set Start & End Position’, and select ‘Find Start Position’. In the dropdown list, pick ‘Text match: after’ and type the text right before the order number, which is “order ”.
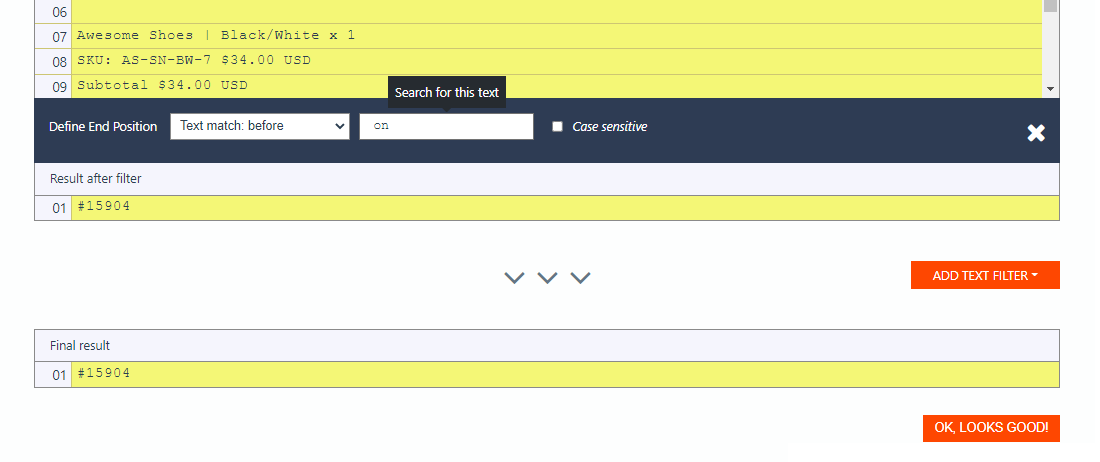
After that, add a second filter and choose ‘Define End Position’. Select Type ‘Text match: before’ and type “ on”. As you can see, this text filter locates the data you want by removing the text before and after it.
The result should look like this:
Save the filters, type the Rule name “Order number”, and save the Rule. This is how you set up Parsing Rules in a nutshell.
Create Parsing Rules for every data field
Repeat the same process for the other data fields, namely:
- Date and time
- Item description
- SKU
- Subtotal
- Shipping
- Total
- Payment processing method
Feel free to try different filter options to isolate data with perfect accuracy. For instance, you can add a filter that removes empty lines. Instead of choosing ‘Set Start & End Position’, move your cursor to ‘Replace, Remove & Insert’ then select ‘Remove Lines & Entities’. In the dropdown list that will appear, select ‘Remove Empty Lines’ and the Parsing Rule Editor will remove empty lines, allowing Mailparser to extract your data without keeping the cumbersome blank space.
By the same token, if you want to remove text within the same line, you can set the End Position to ‘next blank space‘ and the filter will remove all the text that comes after the data you want.
There are plenty of other ways to find and organize email data such as:
- Searching for an email address, phone number, tracking number, etc.
- Splitting names into first and last name
- Format dates
- And more
Overall, Mailparser offers a vast range of possibilities to help you extract your data exactly how you want it.
Step 5: Parse data
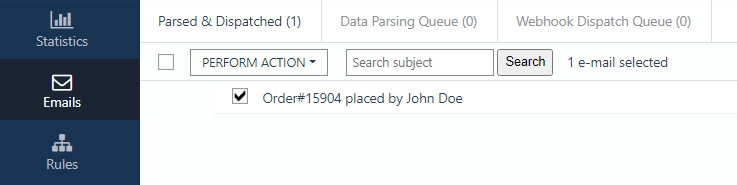
After you set up all Parsing Rules, go back to the ‘Emails’ section and select your sample email. Click on the ‘Perform Action’ button and pick ‘Move to Parse Queue’.
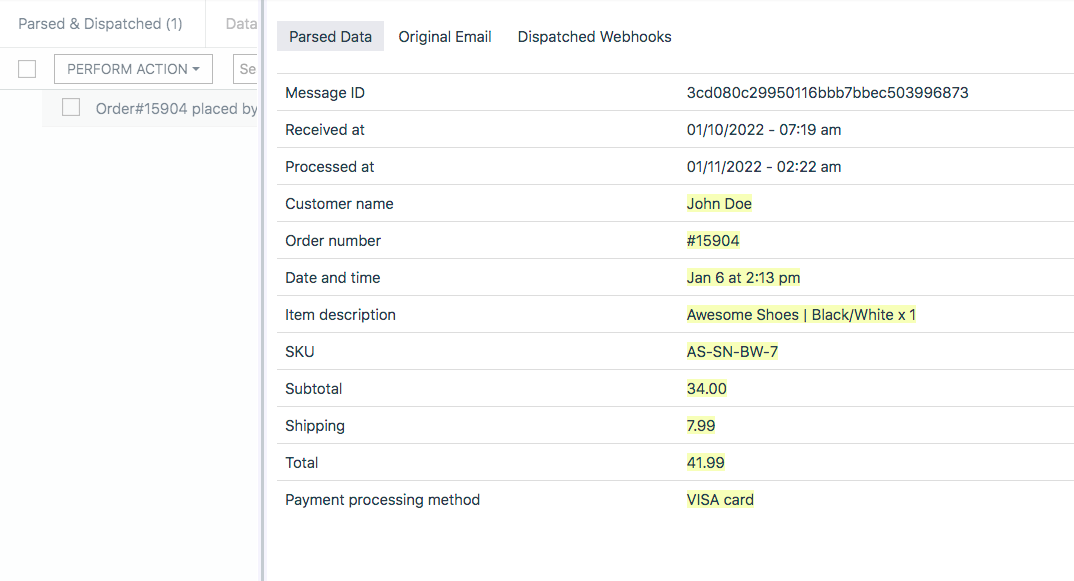
Mailparser will start the parsing process according to the Parsing Rules you created. Wait for a moment and check the result by clicking on the sample email:
All order data has been extracted exactly as instructed by the Parsing Rules. Great!
Now you can forward any number of order emails that have the same structure and data fields to your inbox and Mailparser will extract them with equal accuracy.
Step 6: Export your parsed data
Alright, so here’s the final step to setting up your automated workflow.
You have two options for exporting your data: either download it as a file or send it to a cloud app. Here’s what you need to do in each case.
Option 1: Download your parsed data
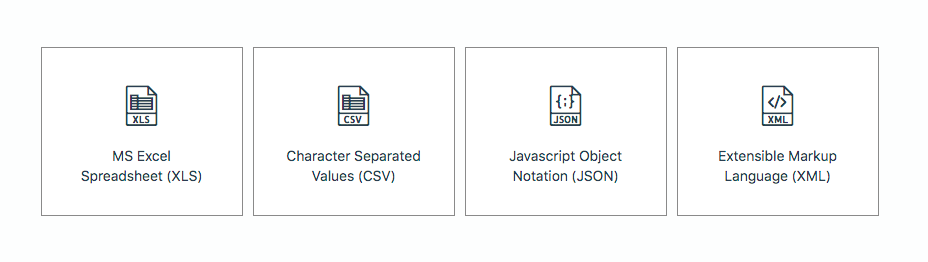
You can download your parsed data to a file in XLS, CSV, JSON, or XML format.
To do this, simply go to the ‘Downloads’ section on the left-hand side panel and click on the button that says “Create First Download Link”. Choose the file format you want – for this example, we’re going with MS Excel.
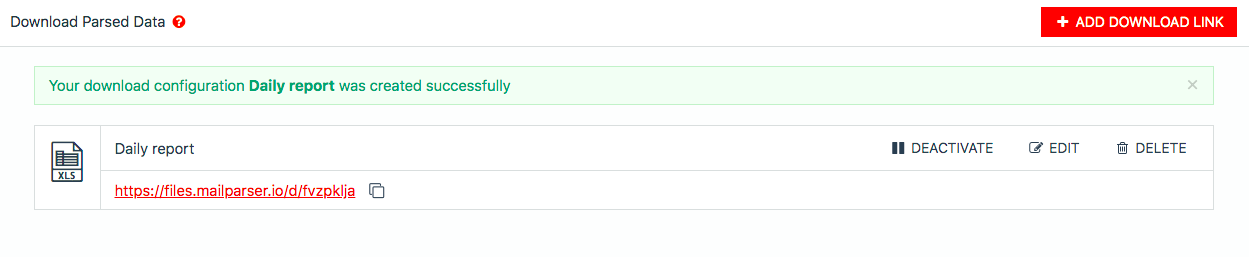
In the next screen, type a name for your download configuration and leave the other fields as they are. Click on ‘Save’ and Mailparser will generate a download link for your Excel file. You can download your file as well as share the download link with the person who needs it.
After hiding the first three columns (which include information specific to Mailparser) and a quick resizing of columns, your downloaded Excel file will look like this:
Option 2: Set up an integration with a cloud application
Aside from saving your orders as a file, Mailparser allows you to export your Shopify orders to virtually any third-party cloud app like
Google Sheets,
Zapier, or
Slack.
To do this, you need to set up an integration with the app you want. Go to ‘Integrations’ on the left-hand side panel and click on the button ‘Add New Integration’. You’ll see multiple integration options. For this example, we’ll go with Zapier, which users often use to connect Mailparser to their cloud app.
Select Zapier as your integration then add your Zapier account in the screen that appears afterward. Authorize Mailparser to access your Zapier account, then click on ‘Save & Test’.
Now, go to your Zapier account, select the instant Mailparser trigger and an action to export your data to a third-party cloud app. Zapier will send any email data parsed in Mailparser to that app.
Mailparser FAQ
Can Mailparser extract data from email attachments?
Absolutely! Mailparser can identify and extract data from the subject line, recipient, body, and attached files.
If you frequently receive documents that require processing, we recommend you try
Docparser, the companion app to Mailparser that focuses on extracting data from documents.
What can I do if I don’t find my cloud app among your integrations?
Mailparser can integrate with over 1,500 cloud apps. If you haven’t found the app you use in our
integrations page, just let us know
here and we will set up a custom integration for you.
What other workflows can I automate with Mailparser?
Beyond the order workflow, you can use Mailparser to automate other workflows, namely:
- Reaching out to shoppers with abandoned carts
- Cancelling customer orders
- Adding new leads to a CRM like Salesforce
- Verifying the delivery status of orders
Automating order workflows will help you send order data to your coworkers and business partners without delays. This, in turn, enables you to scale your Shopify business without getting overwhelmed by the increasing amount of orders to process. As you delegate the busywork to automated tools, you will free up plenty of time to deliver more value to your customers.
If exporting your orders automatically sounds like a better way to run your Shopify store, give Mailparser a try. Start your free account today and automate your workflows.


 You’ll find the sample email in the ‘Emails’ section of your dashboard, under the ‘Original Email’ tab.
 In the next screen, you have to select the data source. Make sure the source is set to ‘Body’ and ‘HTML’.
 Scroll down a little bit and you’ll see a dropdown list titled ‘Define End Position’. Select the option ‘Text match: before’ and type “ placed order” since that’s the text that comes right before the customer’s name. Make sure to include the space after the customer’s name. Mailparser will remove all the data that comes after “ placed order” thus isolating the customer’s name.
 Click on the ‘OK, Looks Good!’ button, type the name “Customer name” for this Parsing Rule, then click on ‘Validate & Save’.
 Save the filters, type the Rule name “Order number”, and save the Rule. This is how you set up Parsing Rules in a nutshell.
 Mailparser will start the parsing process according to the Parsing Rules you created. Wait for a moment and check the result by clicking on the sample email:
 All order data has been extracted exactly as instructed by the Parsing Rules. Great!
Now you can forward any number of order emails that have the same structure and data fields to your inbox and Mailparser will extract them with equal accuracy.
All order data has been extracted exactly as instructed by the Parsing Rules. Great!
Now you can forward any number of order emails that have the same structure and data fields to your inbox and Mailparser will extract them with equal accuracy.
 In the next screen, type a name for your download configuration and leave the other fields as they are. Click on ‘Save’ and Mailparser will generate a download link for your Excel file. You can download your file as well as share the download link with the person who needs it.
 After hiding the first three columns (which include information specific to Mailparser) and a quick resizing of columns, your downloaded Excel file will look like this:

 Select Zapier as your integration then add your Zapier account in the screen that appears afterward. Authorize Mailparser to access your Zapier account, then click on ‘Save & Test’.
Now, go to your Zapier account, select the instant Mailparser trigger and an action to export your data to a third-party cloud app. Zapier will send any email data parsed in Mailparser to that app.
Select Zapier as your integration then add your Zapier account in the screen that appears afterward. Authorize Mailparser to access your Zapier account, then click on ‘Save & Test’.
Now, go to your Zapier account, select the instant Mailparser trigger and an action to export your data to a third-party cloud app. Zapier will send any email data parsed in Mailparser to that app.