Here’s a scenario that AP teams dread: you’re inputting invoice data, but it’s taking more time than expected. A day or two later, you get an email or call that tells you about some incorrect data. So now you have to rectify that mistake and double-check all entered data again — before the invoice gets processed or, even worse, paid. The invoicing process slows down and you’re feeling more and more stressed.
The good news is you can avoid this issue by using invoice data capture software. Instead of spending hours every week typing data, you can just extract it from invoices and into your database. In this blog post, we’ll examine what invoice data capture is and how you can use Mailparser to extract invoice data from incoming emails and send it to your system. Let’s dive in!
Extract Data from Invoice Emails with Mailparser
Save countless hours of tedious data entry and streamline your document-based workflows.
no credit card required
What Is Invoice Data Capture?
Invoice data capture is the process of extracting data from invoices and entering it into an accounting or ERP system. This process is carried out by an automation tool that can scan invoices — both scanned and electronic — and extract their contents.
Traditionally, employees in an AP department would enter data into their system by themselves, but now automation tools can perform this task with higher accuracy and in much, much less time.
By using invoice data capture software to capture invoice data, you will put an end to the problems stemming from manual invoice processing:
- Mistakes: every AP team that hasn’t automated invoice processing yet is often dealing with incorrect data, missing invoices, double payment, and other frequent mistakes.
- Delays: long approval cycles cause delays in payments, which damages supplier relationships and creates extra stress for your AP department.
- Fraud: this is more common than you’d think. Traditional invoice processing leaves the door open for fraudulent payments, manipulation of financial statements, cyberattacks, and more. Automation, on the other hand, moves data straight from invoices to your system.
Businesses receive invoices in various ways: mail, fax, electronic documents, and email. If email is your main channel for receiving invoices, the best way to capture invoice data is to use an email parser like Mailparser.
Extract Data from Invoice Emails with Mailparser
Save countless hours of tedious data entry and streamline your document-based workflows.
no credit card required
What Invoice Data Capture Software Helps You Accomplish
Lower AP processing costs
As we said a few paragraphs above, invoice data capture software can perform data entry in place of humans at a much faster pace. As a result, you save a great amount of time, therefore lowering the cost of processing invoices. Additionally, thanks to the improved data accuracy enabled by automation, you will prevent the cost of incorrect data.
Streamline invoicing workflows
As automation takes care of the data entry process, employees can directly access data on their system, approve invoices, and schedule payments faster. This way, the AP department can easily avoid miscommunication, delays, and other inefficiencies that slow down the entire invoicing workflow. And as you can guess, staff productivity will improve as a result.

Improve staff productivity
Once your AP team starts using invoice data capture software, employees will breathe a sigh of relief as they no longer need to spend several hours per week inputting data manually and double-checking it before sending it for approval. Instead, they will have more time for other tasks such as processing payments, managing cash flow, and so on.
Improve invoice data accuracy
Another huge advantage of implementing invoice data capture software is that you eliminate discrepancies caused by human error, an inevitable byproduct of manual data entry. As long as your data capture software is properly set up, your invoice data will become a lot more accurate and reliable, making it easier to prevent mistakes and embarrassing situations.
Improve supplier relationships
As you reduce the time needed to process invoices, you can pay suppliers faster which improves your relationship with them. This translates into negotiating discounts, better customer service, closer cooperation, and, in some industries, better material sourcing.
So these are the main benefits of implementing invoice data capture in your Accounts Payable department. If you are wondering whether this will require a costly investment or a steep learning curve, worry not: getting started with invoice automation is actually very easy and commitment-free. Keep reading to learn how to use Mailparser to extract invoice data from incoming emails into your system.
How to Use Mailparser as Your Invoice Data Capture Software
Step 1: Create a Mailparser account
First things first: start by signing up for a free Mailparser trial.
For an optimized experience, we recommend you fill out some details about your business: industry, company size, how many emails you receive, and how many you want to parse.
Step 2: Create your Mailparser inbox
After doing this, it’s time to create your first Mailparser inbox. This is where you will forward your invoice notification emails to parse them. Just click on the orange button ‘Create Your First Inbox’ and type a name for your inbox. For this example, we’ll keep it simple and use the name ‘Invoices’.
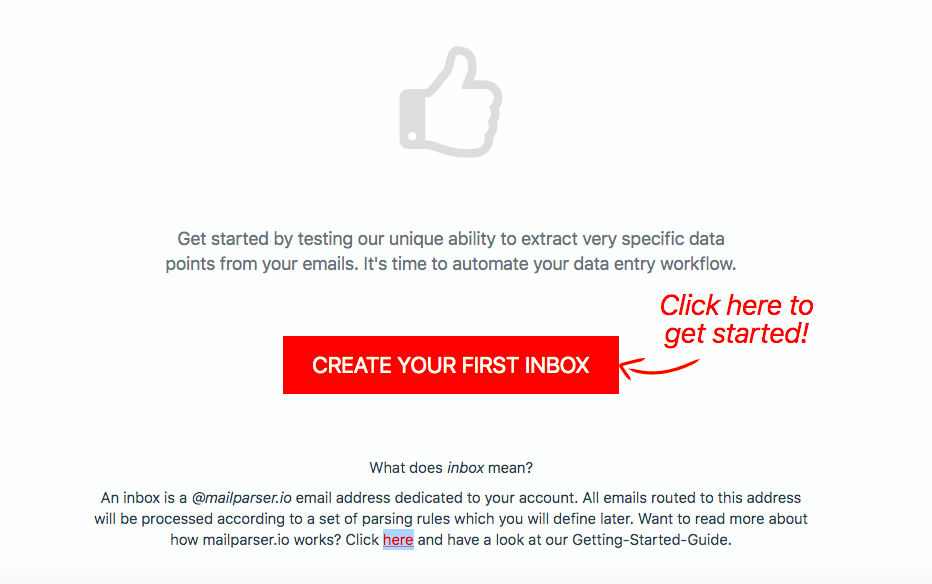
Mailparser will generate a unique email address for your inbox.
Note that you can create multiple inboxes for different types of recurring emails. This means you will be able to use Mailparser not only for invoice processing but for any workflow where you need to input data from incoming emails.
Step 3: Send a few sample emails
To build your invoice email parser, you need at least one email to use as a sample. We recommend you forward not just one but a few invoice notification emails to your Mailparser address.
Once you do, head to your Mailparser dashboard and click on the ‘Emails’ section in the left-hand side panel. You’ll see that your forwarded emails have arrived.
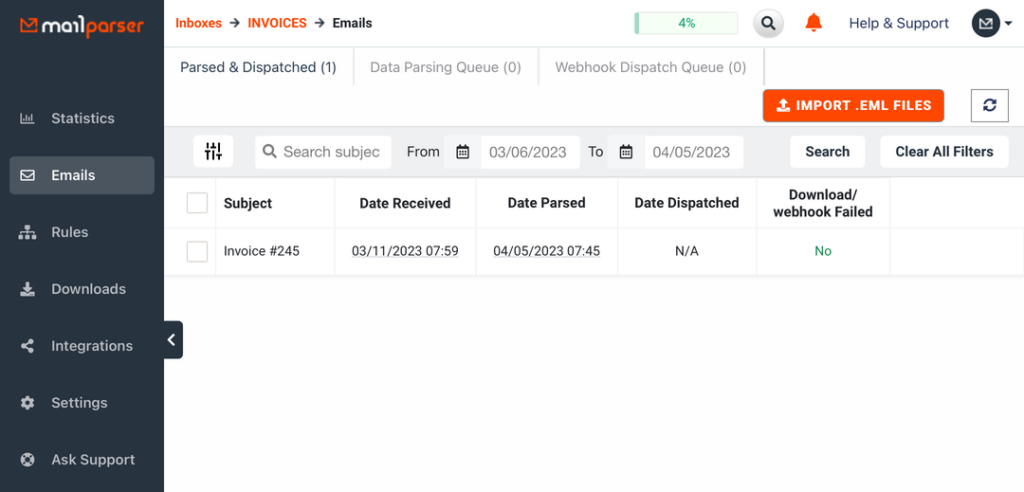
In this example, we have three emails with the invoices attached as PDF files.
Step 4: Create your Parsing Rules
Now for the main part: Parsing Rules are the instructions that Mailparser relies on to identify every data field and extract it. For each data field (invoice number, date, items, etc.), you need a Rule.
Go to the ‘Rules’ section in the left-hand side panel and click on the button ‘Create a Parsing Rule’.
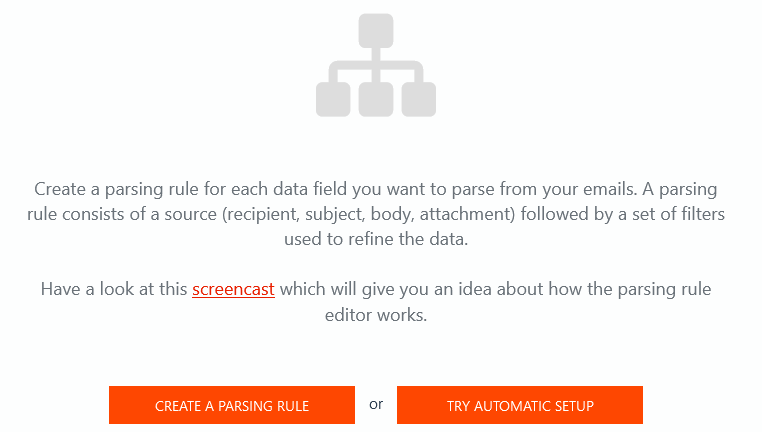
First, select ‘Attachment’ as the data source since the invoice is attached to the sample email. The Parsing Rule Editor will extract the contents of the PDF and display them as raw data.
Create a Rule to extract the supplier’s name
The first Rule we want to have is the supplier’s name, which is found in the first row of the extracted data.
Scroll down and click on the button ‘Add Text Filter’ on the right. Move your cursor to ‘Set Start & End Position’ and select ‘Define End Position’.
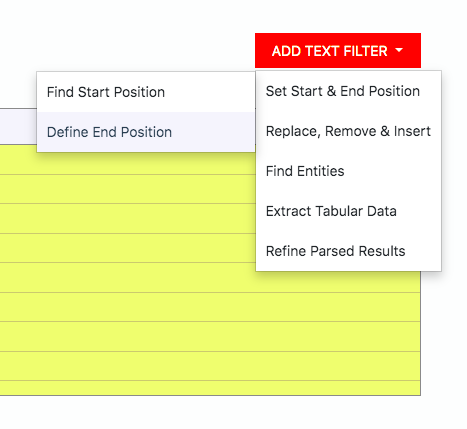
There are several ways to define where a data field ends. In this case, the option selected by default, ‘End of line’, works just fine. The supplier’s name is isolated from the rest of the data.
So scroll down and click on the button ‘OK, Looks Good!’. Type the name ‘Supplier Name’ for this Rule and click on ‘Validate & Save’. The first Rule is done!
Mailparser will take you back to the list of Parsing Rules. To create another Rule, click on ‘+ Add Parsing Rule’.

Create a Rule to extract the invoice number
This time, let’s try to extract the invoice number. Once again, select ‘Attachment’ as the data source and scroll down. We want to isolate the specific row that contains that information. So click on ‘Add Text Filter’, move the cursor over to ‘Set Start & End Position’ and select ‘Find Start Position’.
There are various ways to find where a data field starts. We’re going to use the option selected by default: ‘Text match: after’. As the name suggests, we’re going to enter the text that comes right before the invoice number. In this case, it’s “Invoice # ”. Don’t forget the blank space before the number!
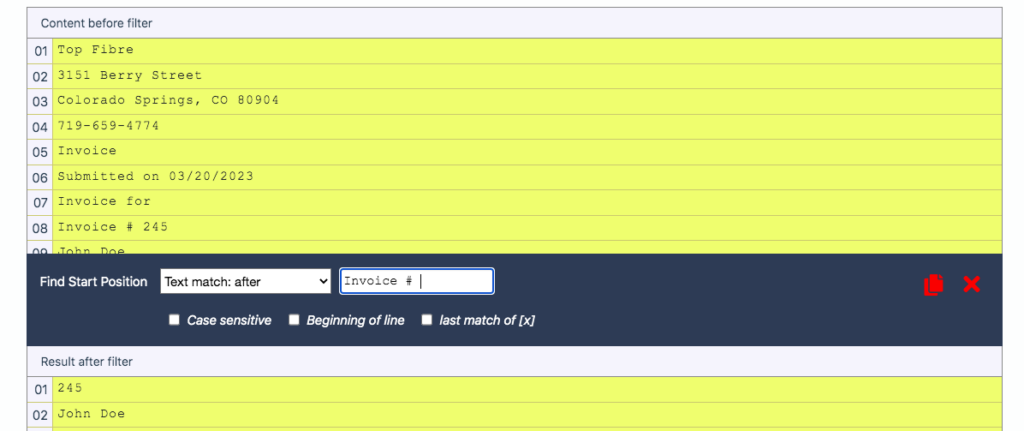
To set the end position for this Rule, add a new text filter, and choose ‘Define End Position’. The default option ‘End of line’ will do the job. This only took two clicks!
Save this Rule under the name “Invoice Number” and move to the next Rule. Play around with the various text filters to extract the other data fields. Let’s go through one more example: the line items of the invoice.
Create a Rule to extract the line items
Add a rule and pick the PDF attachment as the data source. But this time, since we want to extract a table, be sure to select ‘File Content: Table Cells’ from the drop down list titled ‘Parse attachments’.
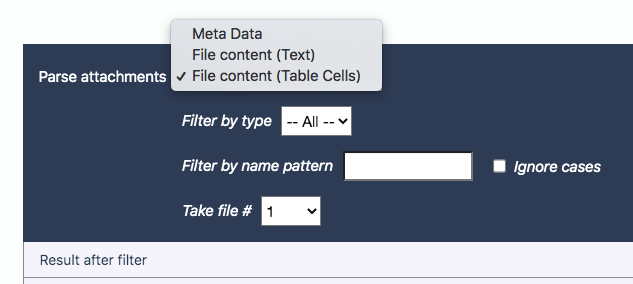
Alright, so now we have to add a few table filters.
Remove rows
Scroll down and click on ‘Add Table Filter’. We want to remove all the data that comes before the table, go to ‘Remove, Select & Insert’, and select ‘Remove Rows’.
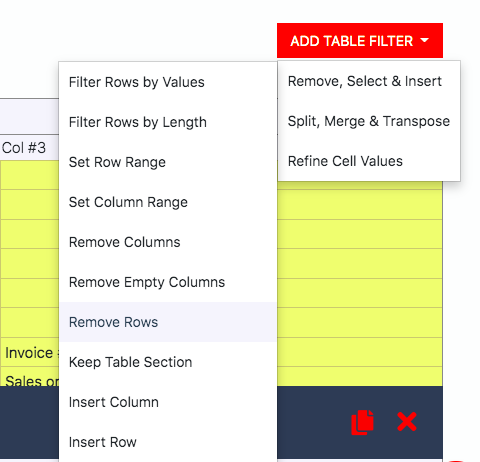
Next, you choose the range of rows that you want to remove. For this example, we’re going to pick from row #1 to row #12. The table filter will remove all these rows so that the data left starts with the first item on the invoice.
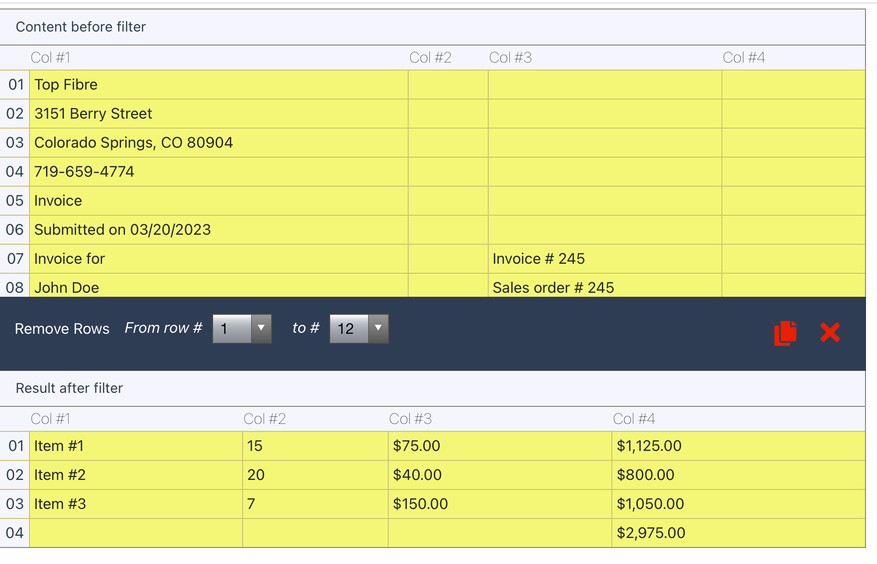
Good! Now we just need to isolate the line item column from the other columns — for optimal parsing, each column in this table should have its own Rule.
Remove columns
So click on ‘Add Table Filter’, go to ‘Remove, Select & Insert’, and select ‘Remove Columns’. After that, type the numbers of the columns you want to remove, separated by commas: 2,3,4
As you can see, the filter is applied and only the column with the line items remains.
Keep only the line items
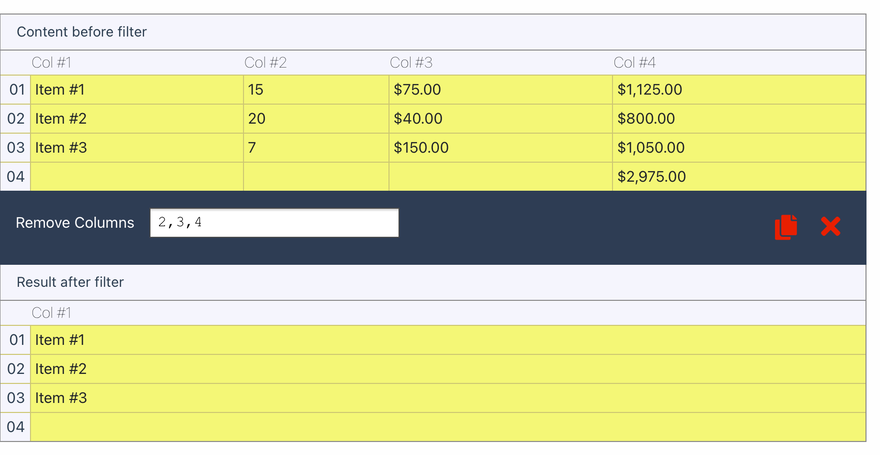
One last thing: we want to remove the empty row. To do this, add a new table filter, head over to ‘Remove, Select & Insert’ and select ‘Filter Rows by Values’.
The option selected by default is ‘Keep row if column #1 has a value’. This means the filter will remove all rows that don’t have a value, in other words empty. Take a look at the result:
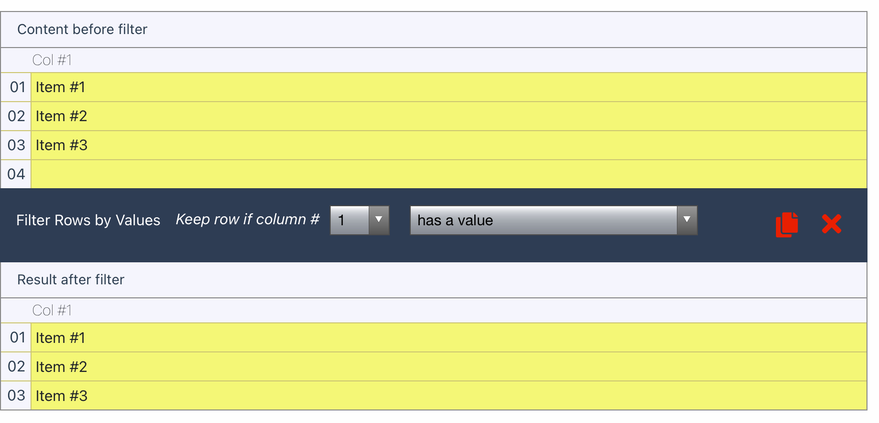
Success! All line items have been extracted and formatted as wanted. Don’t forget to type a name for this Parsing Rule and save it by clicking on ‘Validate & Save’.
Create Rules for the other data fields
By now you know how Mailparser works. Add a rule for every data field and play around with filters until you get your data points structured and formatted correctly. There are filters that allow you to:
- Split columns
- Filter rows with empty cells
- Remove currency signs
- Remove thousand separators
- And more.
So feel free to add rules for the remaining data fields: quantity, unit price, and total price.
Step 5: Download or export your invoice data
This last step consists of choosing where you want the extracted invoice data to go. You have two main options: download your parsed data as a file, or export it to a cloud application. Let’s review both options.
Option a: Download extracted data as a file
If you want to download your invoice data, go to the ‘Downloads’ section then click on the button ‘Create Download Link’.

There are four download formats: XLS, CSV, JSON, and XML. Choose the format you want and type a name for your file. After that, scroll down and click on ‘Save’ to generate the download link. Once the link appears, click on it and save your file.
Option b: Export extracted data to a cloud app
If you prefer to send your invoice data to a cloud app you use, then you need to set up an outbound integration. In the ‘Integrations’ section, click on the button ‘Add New Integration’.

There are many integration options to choose from. For example, you can send parsed data to Google Sheets or Microsoft Power Automate. You can also use the Zapier integration to connect Mailparser to virtually any cloud application, making it easy to move data from invoices to your systems.
Extract Data from Invoice Emails with Mailparser
Save countless hours of tedious data entry and streamline your document-based workflows.
no credit card required
Mailparser Use Cases
Mailparser users are able to extract data from order notification emails directly into their system, without the need to spend hours typing data or developing a data extraction solution from scratch.
Here is how one user uses Mailparser to speed up their processes and save time:
“The usability of mailparser.io allows us to receive order emails with the proper amount and product ordered, as well as customer billing & shipping information in a structured table format. We use their Google Sheets webhook to create invoices and purchase orders that we can send via email, and are printable for our customers. Our previous order process took 4-8 hours/week. With mailparser.io we reduced this to less than one hour weekly. This made mailparser.io an easy decision to use.”
Dr. Matthias Wegner – Gebetshaus-Freiburg
There is also this review on Capterra which describes the advantages of using Mailparser for invoice processing:
“Instead of manually typing thousands of invoices, from suppliers that don’t have the option to build a simple interface with our system, I used Mailparser, this way to save work time and improve the accuracy.
Although Mailparser has lots of options which helped me to achieve exactly what I need, it was very simple and easy to work with. The option to parse text from attachments and from the email’s text, and merge them together is very useful.”
Rabin L., Global Information Systems & IT Manager
Frequently Asked Questions
What is email parsing?
Email parsing refers to the use of a software tool called email parser to extract data from emails. By converting recurring emails to structured data, you automate data entry and streamline your business processes, from invoice processing to lead capture, order fulfilment, and more.
What if I don’t receive invoices by email?
If you receive invoices via other channels, like fax or a document management software, we suggest you use Docparser, the sister app to Mailparser. Read this blog post to learn how to use Docparser for invoice data capture.
Is Mailparser secure?
Yes. Your data belongs to you and we will not look at it unless you require assistance. We use bank level encryption and regularly update our servers with the latest security patches. For more detailed information, read our security statement.
Use Mailparser to Capture Invoice Data
Processing invoices is a crucial part of your daily operations, but it doesn’t have to be a time-consuming and stressful process. By implementing the right invoice data capture software into your system and workflows, your AP department will significantly reduce processing time and cost while improving data accuracy.
Leave manual processing behind and use Mailparser to automate invoice processing and free up time for more important work. Sign up for a free trial today and build your invoice data capture solution.
Extract Data from Invoice Emails with Mailparser
Save countless hours of tedious data entry and streamline your document-based workflows.
no credit card required
