What Are Shipping Confirmation Emails?
Let’s review the order process from the beginning: a customer places an order on your online store and they receive an order confirmation email. On your end, you receive the new order notification and start processing the order.
Once you ship that order, your shipping provider will send you an email with a tracking link and number. You then send your customer a shipping confirmation email with their order and tracking information.
A shipping confirmation email typically includes the following information:
- Order ID
- Order details
- Items bought
- Payment information
- Shipping details
- Address
- Shipping method
- Estimated delivery date
- Tracking link and number
To deliver a stellar post-purchase experience, you need to send shipping confirmation emails in the shortest period of time possible following new customer orders. And one of the best ways to do this is to replace manual data entry with data extraction. We’ll show you how to do this, but first, it’s important that we establish the importance of shipping confirmation emails.
Why Are Shipping Confirmation Emails Important?
Shipping confirmation emails are important for your customers because they contain the tracking number and URL they need to track the status of their delivery.
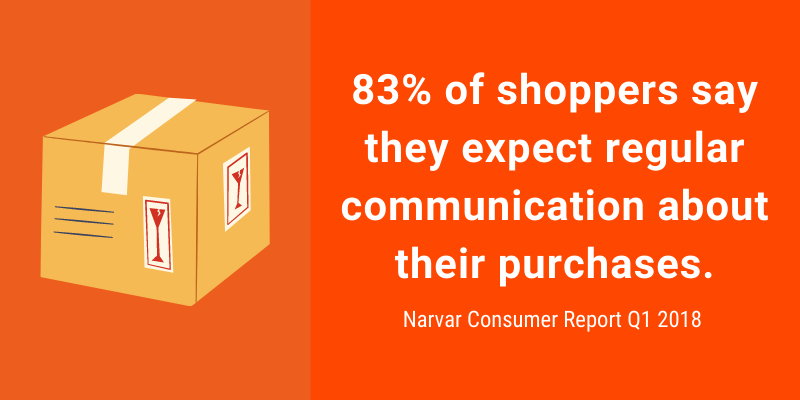
64% of consumers consider transaction confirmations to be the most valuable emails in their inbox.
– Litmus
Because of that, these emails tend to have high open rates. So you should take advantage of this and include cross-sells and upsells in your shipping confirmation emails.

When customers open their emails to get their tracking information, they will most likely still be in a strong buying mood, meaning you will have good chances of selling them additional items. So shipping confirmation emails are important for you as well.
So you need to have a shipping confirmation email template that you can easily fill out with customer information.
Luckily, we have a free template you can download and use in your email marketing. You’ll find it near the end of this post, but for now, keep reading!
Why You Should Automate Shipping Confirmation Emails
Sending shipping confirmation emails manually requires you to:
- Locate the email sent by your shipping provider
- Copy and paste the tracking information into an Excel spreadsheet
- Create a new shipping confirmation email
- Copy and paste the order & tracking information into the email
- Double-check everything and send the email
- Repeat this process for every order
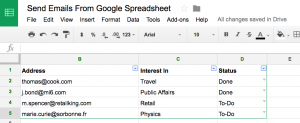
If you are not looking to acquire a CRM or order management app, then you most likely manage your orders on spreadsheets. If so, you need to open every email sent by your shipping partner and copy/paste the tracking information into the right order.
This process can take a lot of time when you have multiple orders. And the more you grow your online store, the more orders you’ll receive, and so the more tracking information you’ll have to enter manually. This will cause a lot of stress and even data entry errors, leading to issues with customers.
So what if you could automate this process and get all the tracking information neatly organised in an Excel spreadsheet? This would allow you to create shipping confirmation emails much faster. You won’t have to waste time opening dozens of emails and entering the tracking numbers and URLs manually.
Automating this process is particularly helpful if you are running a one-man operation and have many other tasks to handle.
So here’s the great news: you can do this with Mailparser.

How to Automate Shipping Confirmation Emails with Mailparser
Mailparser is an email parser that extracts data from incoming emails. Mailparser allows you to not only automate data entry, but also download your data as a file or send it to a third-party cloud application. So you can use it to extract tracking data sent by shipping providers like FedEx and UPS.
Here is the step-by-step process to automate shipping confirmation emails with Mailparser:
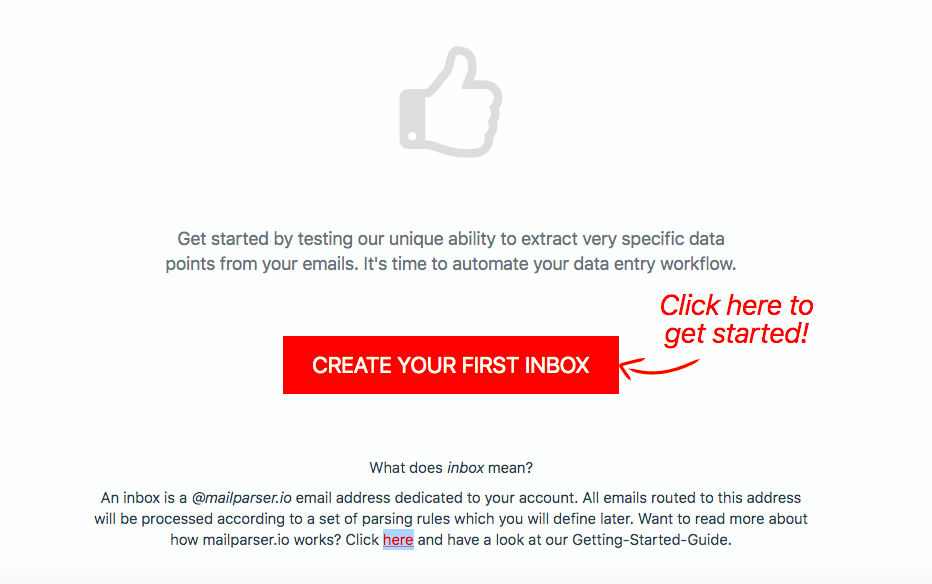
Step 1: Create a free Mailparser account
Start by signing up for a free Mailparser account. You don’t need to enter credit card information beforehand and there is no time limit either. You can use all features from the get-go to parse up to 30 emails per month.
Step 2: Create an inbox
The second step is to create an inbox where you will receive the shipping notification emails sent by your shipping provider. This is as simple as clicking on the button that appears right after creating your account. Mailparser will generate a unique email address for your inbox.
Step 3: Forward emails to your inbox
Go to your business inbox and forward one or several emails sent by your shipping provider to your Mailparser inbox. For this example, we are going to use one test email. Once you send a sample email, you will see a prompt to add Parsing Rules.
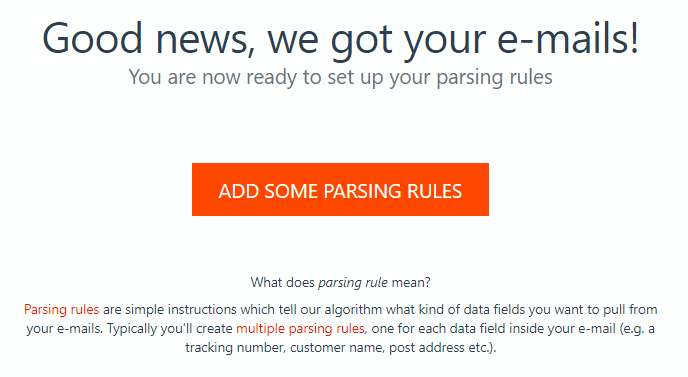
Step 4: Create Parsing Rules
Parsing Rules are what allow Mailparser to identify and extract the data you want. You need to create Parsing Rules before you can start extracting data from incoming emails. But don’t worry: you won’t have to write lines of code or anything like that. For each data field, you want to create a Parsing Rule that consists of one or several filters.
As shown in the screenshot above, click on the button that says ‘Add Some Parsing Rules’.
Alternatively, you can go to the ‘Rules’ section on the left-hand side panel of your dashboard and click on the ‘Try the Automatic Setup’ button.
In both cases, Mailparser will take you to the Quick Setup screen. Select your test email from the dropdown list on the left, then choose ‘Generic Machine Created Email’ from the dropdown list on the right. Mailparser will attempt to automatically create Parsing Rules from the email.
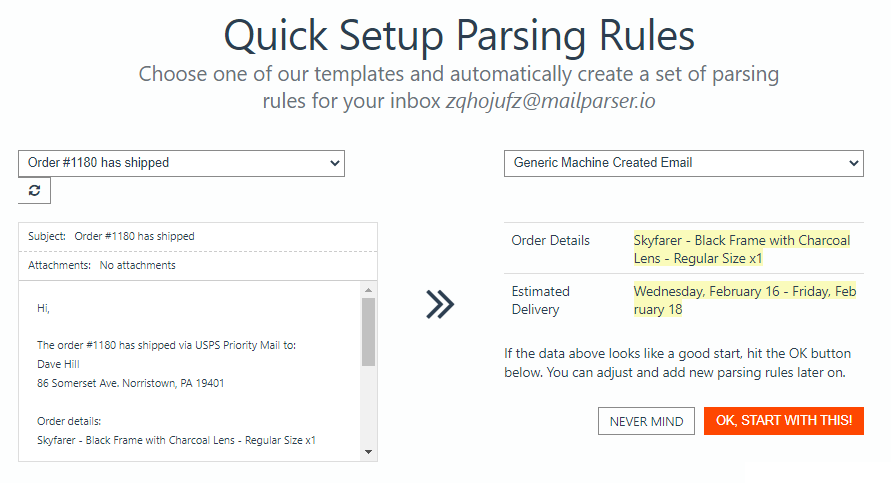
So in this case, two Parsing Rules have successfully extracted the order details and the estimated delivery date, but the truly important data, the tracking number and URL, has yet to be extracted. Still, this is a good start, so we’re going to confirm by clicking on ‘OK, Start with This!’ and create additional Parsing Rules for the following data:
- Order number
- Shipping service
- Customer name
- Customer address
- Tracking number
- Tracking link
Create the “Order number” Parsing Rule
Mailparser will take you to the ‘Rules’ section of your dashboard. Click on the ‘Add New Parsing Rule’ button at the top right of the screen.
Now, select both ‘Body’ and ‘Plain Text’ as the data source. You will see the body of the email in plain text right below.
To create a Parsing Rule for the order number, you need to create text filters that tell Mailparser where the order number is located. So click on the ‘Add Text Filter’ button on the right, move your cursor to ‘Set Start & End Position’ and select ‘Find Start Position’.

There are different ways to set the starting position of the data you want. The dropdown list is set by default to ‘Text match: after’, which is what we need here. Type the text that comes before the order number in the field on the right – it’s “The order “. Be sure to include the blank space after the word “order”.
You will then see a preview of the text filter:
Now, we need a second filter to remove the text that comes after the order number. The process is the same but with a few differences. Scroll down and add a new text filter but, this time, choose ‘Define End Position’. Set the End Position to ‘Next blank space’ and the filter will remove everything that comes after the order number. Pretty neat!
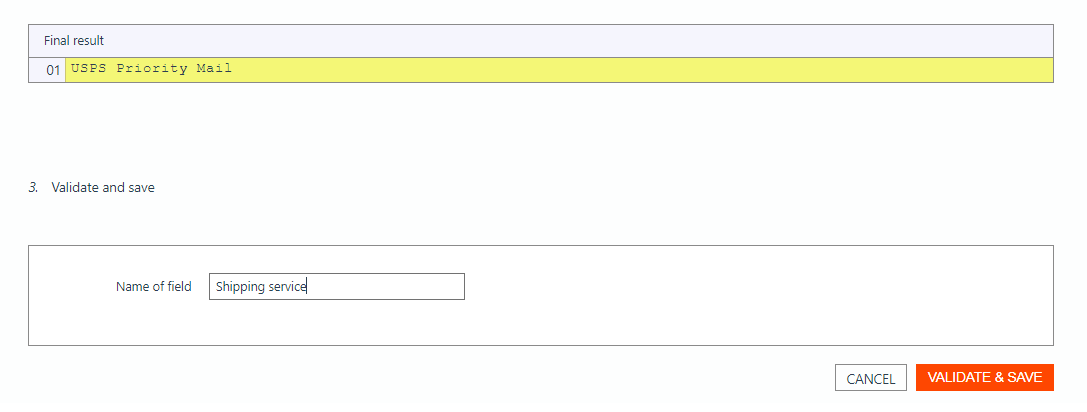
Click on the ‘OK, looks good!’ button at the bottom right. Type the name “order number” for this Parsing Rule and click on ‘Validate & Save’.
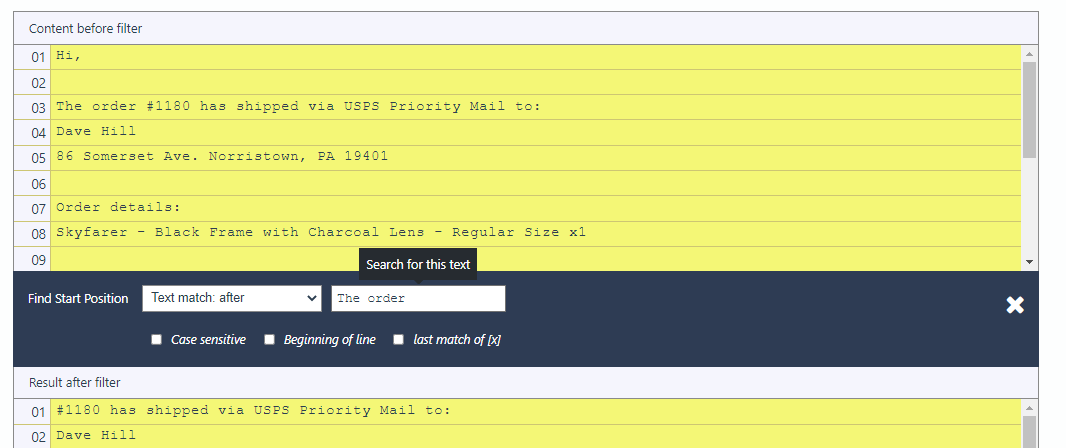
Create the “Shipping service” Parsing Rule
Mailparser will take you back to the Rules screen. Note that you can change the order of the Parsing Rules by selecting one of them and dragging it where you want it to be. That way, you can have the extracted data arranged the same way as it was in the original email.
Click on ‘+ Add Parsing Rule’ to create a new Rule for the shipping service.
Once again, select ‘Body’ and ‘Plain Text’ as the data source. Create a text filter and set the Start Position to ‘Text match: after “via “’.
Next, add a second filter to set the End Position. This time, choose ‘Text match: before’ and type “ to”, which is the text that immediately follows the name of the shipping service.
Type the name of this Parsing Rule and save it. Onto the third!
Create the “Customer name” and “Customer address” Parsing Rules
Follow the same steps we explained for the previous Parsing Rules to extract the customer’s name and address. You don’t have to stick to the filters we used above; feel free to try different filters like “Start Position: after X lines” or “End Position: End of line”. Experiment with filters to find the one that extracts data with the most accuracy.
Note that this is optional: you can skip these two Rules and focus just on the tracking number and URL. It’s all up to you!
Create the “Tracking Number” Parsing Rule
Similar to the previous Rules, set the email’s body as the data source and create a text filter with the Start Position being the text before the tracking number. You can type the entire sentence or just the few words before the tracking number.
Set the End Position to ‘Text match: after’ and type the text after the tracking number. Check the parsing result, name the Rule “Tracking number”, and save it.
![]()
Create the “Tracking Link” Parsing Rule
For this Rule, you don’t need to filter the text before and after the tracking URL. You simply have to create a filter that extracts any URL within the email’s body.
To do this, click on ‘Add Text Filter’ and go to ‘Find Entities’. Select ‘Links (URL & Title)’.
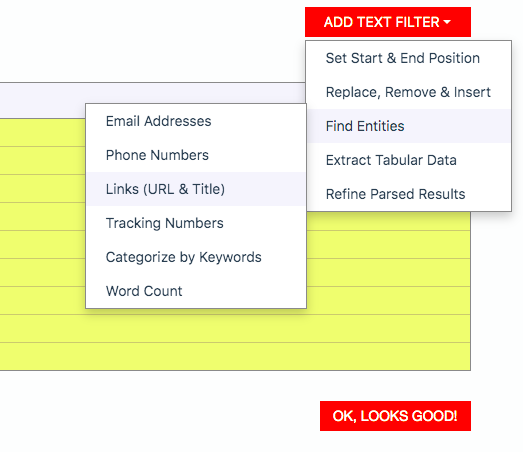
In the dropdown list below, choose ‘Link URL’. The filter will isolate the tracking URL, as shown in this screenshot:
![]()
Confirm the filter by clicking on ‘OK, looks good!’, type the name “Tracking link” for this Rule and save it.
And that’s all the Parsing Rules we need to extract data from shipping confirmation emails. It’s time to see what the parsing results look like.
Step 5: Parse emails
Go back to the ‘Emails’ section of your dashboard and select your sample emails. Click on the ‘Perform Action’ button and select ‘Move to Parse Queue’. Mailparser will start parsing the emails and show you the results shortly afterward.
Click on the test email and verify that the data has been accurately extracted. You can always go back to your Parsing Rules and edit them (or even add new Rules) to improve the parsing results.
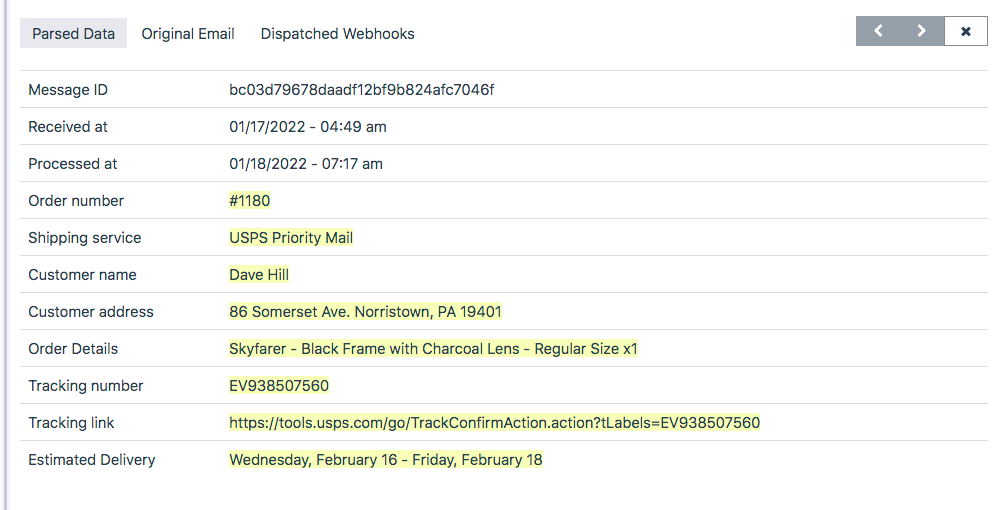
As you can see, all the data has been successfully extracted. That was pretty simple, wasn’t it?
Step 6: Export your parsed data to Excel or a cloud app
We’re almost done with setting up your email parser to extract shipping information from emails.
You have a choice between downloading your parsed data as a file or sending it to a cloud app. Let’s see what you need to do in both cases.
Option 1: Download your parsed data
You can download your shipping information to an XLS, CSV, JSON, or XML file.
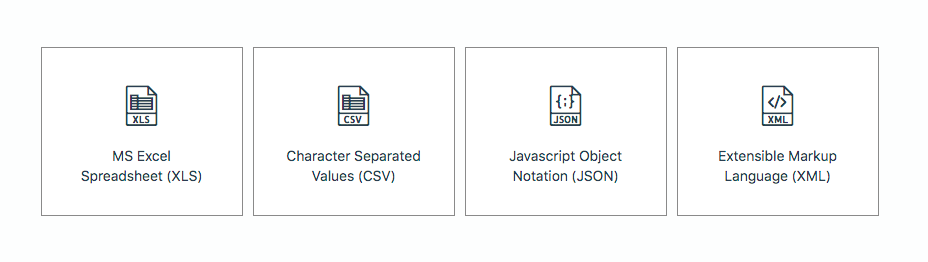
Head over to the ‘Downloads’ section and click on the button ‘Create First Download Link’. Choose the format you want and Mailparser will generate a download link – simple as that!.

To get a better idea of how to use Mailparser to download email data to Excel, watch this video:
Option 2: Export your data to a third-party cloud application
To export your data to a cloud app, you need to set up an integration with that app. To do that, click on ‘Integrations’ on the left-hand side panel then click on the button ‘Add New Integration’.
Choose an integration from the options displayed: Google Sheets, Zapier, etc.
If your cloud app is not among the suggestions, simply click on ‘Generic Webhook’ to connect your Mailparser account to any API endpoint via a specific URL.
To learn more about webhooks, read this article: What is a webhook?
From there, add your cloud app account and confirm by clicking on the button ‘Save & Test’. If you choose an integration with Google Sheets, you’ll have to choose a spreadsheet in your Google Drive.
Mailparser will ask for your confirmation to test the integration. Click on the ‘Send Test Data’ button to confirm.
Now when you go to your cloud app’s account, you will find the extracted data there. For this example, we created an integration with Google Sheets:
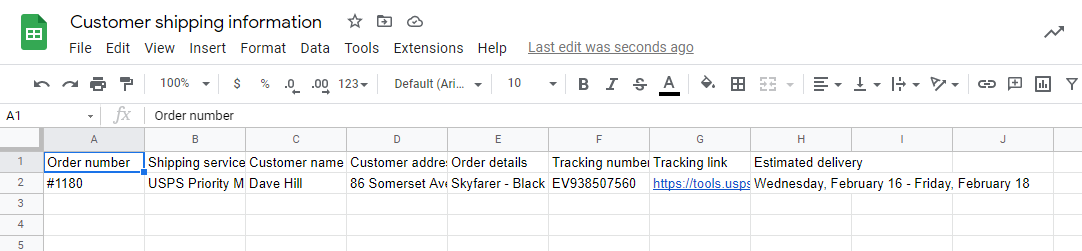
And voilà, your shipping confirmation email has been accurately extracted where you want it to be. All that is left to do is to send shipping confirmation emails to your customers.
Other Use Cases of Email Parsing
Automating shipping confirmation emails is just one use case of email parsing. In fact, there are many other processes you can automate, such as:
- Capture the email addresses of shoppers who add items to their wishlist
- Add new leads to a list for future promotions
- Add new customers to your customer list
Think of the processes in your day-to-day operations. If you always need to look at emails in your inbox and type or copy and paste information into a spreadsheet or software, chances are you can automate that process with Mailparser.
In case you receive documents regularly, like scanned images or PDFs, try Docparser, the document parser that extracts data from incoming documents.
Case Study: Taster’s Club
Taster’s Club is a whiskey club that sends curated whiskey to members every month. The company used to spend a lot of time processing shipping emails. Mack, from the Taster’s Club team, describes that challenge:
“We use a variety of third-party shipping partners to get our products to our customers, but having various shippers made it hard to standardize tracking emails and other shipment-related correspondence with customers.”
After discovering Mailparser, the company started using it to extract tracking information from emails sent by shipping providers.
“We configured our Mailparser address to receive and parse generic tracking emails from each of our shippers. Then, Mailparser’s integration with Zapier lets us re-skin these emails and send them to the customer, from us. We’re able to sit back while it all happens.”
Mack says Mailparser was easy to set up and helped Taster’s Club save a lot of time:
“Mailparser has saved us countless hours over the years. We are able to configure our parsing rules, set it and forget it! We get a consistent, clean stream of data that we can batch process as we choose. It just works.
The parsing rules are so easy to configure, it’s not at all difficult to have a non-technical person configure them. I am a big fan of Mailparser. It actually has saved us tons of time over the years.”
So as you can see, businesses are using Mailparser to automate shipping confirmation emails and save valuable time and prevent human error.
Get Your Shipping Confirmation Email Template Here
As promised at the beginning of this post, we have a free shipping confirmation email that you can download and use.
Whether you have launched your online store recently, or you want to improve your current template, you’ll find this template useful. Feel free to customize your template any way you want: rearrange the information order, change the wording, or tweak the email design to fit the template.
Don’t forget that shipping confirmation emails have a high open rate, so make sure to include a cross-sell or upsell offer.
So here you go: click on the button below to save a copy of our free shipping confirmation email template.
In Conclusion
Shipping confirmation emails are important both for you and your customers. Since they tend to open them to track their orders, you should take advantage of that opportunity to offer additional items.
But before you do that, you need to process emails from your shipping providers to retrieve tracking information. Doing that manually is time-consuming and error-prone, so it’s best to automate shipping confirmation emails to save time and prevent data entry errors.
Overall, automating repetitive processes will help you run your business much more efficiently. You will free up time to process more orders, serve more customers, and take care of other tasks.
So be sure to sign up for a free Mailparser account, and don’t forget to use our free template to send great shipping notification emails!