A question we get quite often at Mailparser is how to forward multiple emails in Gmail to another email address. With forwarding multiple emails we mean sending them individually, one by one.
This question comes not as a surprise to us because a lot of our customers are using Mailparser in combination with Google Mail and want to automatically forward their old existing as well as new emails to their mailparser.io account. And for sure, nobody wants to manually forward hundreds or thousands of emails by hand. Luckily, it’s easy to set up Gmail to forward multiple emails!
When we get this question, we recommend usually one of two possibilities described below. One method is very easy to set up but works only with new emails. The other one is a bit more tricky, but will also work with previously received emails.
Pssst … In case you wonder how to do this in Outlook, please read our guide on how to forward multiple emails individually in outlook.
And if you haven’t done so yet…
Create a Mailparser account
Forward multiple emails in Gmail with filters
The first possibility is using only built-in features of Gmail and is more easy to setup. All you need to do is to create a filter in Gmail and define a forwarding address for this filter. The basic steps for creating a Gmail automatic forwarding filter are:
1/ Define a search term


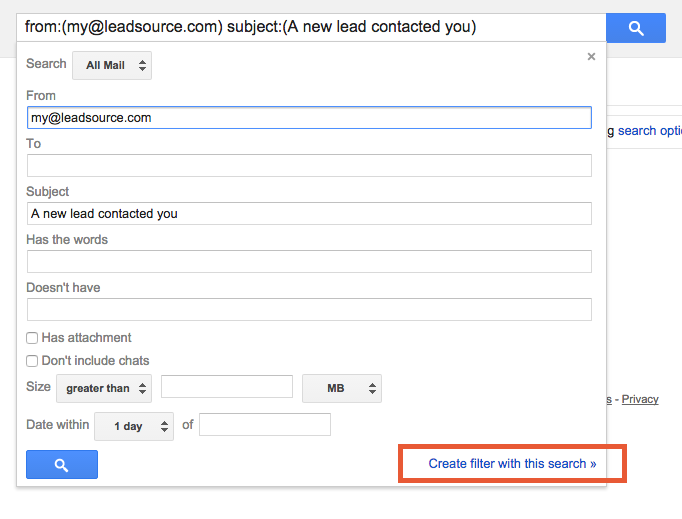
As a first step you need to define a search term which identifies the emails you want to forward. To access the advanced search form panel, click on the little arrow on the right side of the search input.
The advanced search input form lets you define fine grained parameters which will be used to identify your emails. If you have already some similar emails in your inbox, GMail can show you which emails would match your search term. Just click on the blue search icon in the bottom left and a list of matching emails will appear.
2/ Create a forwarding filter based on these search settings

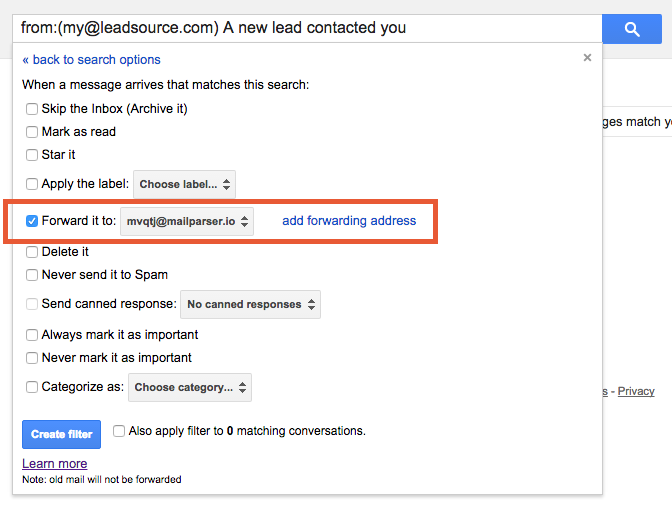
Once you defined your search parameters click on the link “Create filter with this search” in the bottom right of the form. This will bring you to a new form where you can choose what you want to do with the matching emails. Next to things like adding a tag, adding a star or deleting an email, you can choose to “Forward it to …”.
3/ Activate the forwarding filter by clicking a link inside a confirmation email
If you set up a forwarding filter to a new destination address, a confirmation email with a link is sent to this address first. This is necessary for security reasons. By clicking on the link you tell Google that you have access to the destination address and that you don’t spam another person with this.
Please note: If you forward your emails to your @mailparser.io inbox, you also need to click on the activation link. You will find the email containing the link inside your “Incoming Emails” list. Click on it, choose “Original Email” and click on the link. This will activate your forwarding filter.
If you need more details on creating a forwarding filter in Gmail, check out the Google support website where you’ll find more info.
Important! This method has however one disadvantage: It only works with new emails which you receive after creating the filter. Unfortunately it won’t forward old emails which are already stored in your Google mail account.
Forward multiple old emails from Gmail
Luckily, there is another solution which can also mass forward existing emails from Gmail. Setting up this solution is however a bit more tricky and involves using a GDoc spreadsheet. The idea behind this approach is to add a Tag in Gmail, move all Emails with this tag into a GDoc spreadsheet and then forward them with a script.
If this sounds too complicated and like a lot of work, don’t worry! Amit from the Digital Inspirations did an awesome job and documented the whole process step by step. The article guides you through the setup and also includes a video tutorial. In addition to that, Amit also gives you access to his Google Doc spreadsheet which you can duplicate and use for your setup. Click here to read the tutorial and watch the video.


